
I “cut the cheese” today. Did you ever wonder where that saying came from? Thing is, I love the smell of cheese when it’s being made, so yeah… I cut it. I found myself drinking the whey too. And why hasn’t anyone eaten curds and whey since Little Miss Muffet? Did she know something we all didn’t?
I made two wheels of cheese around 2008. One was a parmesan and the other, farmhouse cheddar (an abridged cheddar recipe.) Everything seemed to have went well during the process. I had a cheese mold, but didn’t have a press at the time. I used weight to balance on top of the cheese follower and just did the best I could. In the end, I had two nice-looking wheels of cheese in my “cheese cave” aging. Being the patient guy that I am, I thought I’d let the cheese age as long as it needed, flipping every now and then until I located a “cheese trier” (a little tool that allows you to pierce the rind of the cheese and pull a plug out to try it.) Well, I never got around to that… and still being a juvenile when it came to cheese-making, I thought I’d just let it go. After all aged cheese is always better right? I had it stored in the proper temperature and humidity, so I let it do it’s thing until I could get back around to it.
Well, it *may* have went better had I coated the cheese with wax. Wax holds some needed moisture in and because I neglected to coat it, by the time I went to cut into it (which was just last week, so… 6 years later) it was hard as a rock–both of them. Check out some pics below. The parmesan didn’t look too well, but the cheddar looked delicious! Alas, it too was hard and ruined. Of course, I had to gnaw up some rocks to see how it tasted. A little gritty, maybe dusty… but sharp. I could tell, at one time, it may have been some good cheese! I consider it a lesson learned. However, such a blow makes a man want to right the wrong. It was time to try it again. This time, I have the cheese press built and ready to go.

Cheese making doesn’t require a lot of things, but it does require some special ingredients. Jump on the net, or grab a book. Once you have things in hand, all you need is a little time. By that, I mean set aside an entire day. The process is easy, but the waiting in between steps takes the time… and requires a thermometer, and a timer. I used a cheddar recipe from Home Cheese Making Recipes for 75 Homemade Cheeses. Depending on the cheese you will make, the process has variations., but here are the basic steps.
- Warming the milk (usually to around 86 F)
- Combining additives (optional, sage, caraway, pepper, etc.)
- Adding the starter culture (mesophilic for hard cheeses, thermophilic for soft cheeses)
- Adding the rennet (vegetable or animal rennet)
- Letting it set until you achieve a “clean break”
- Cutting the curds
- Cooking down the curds
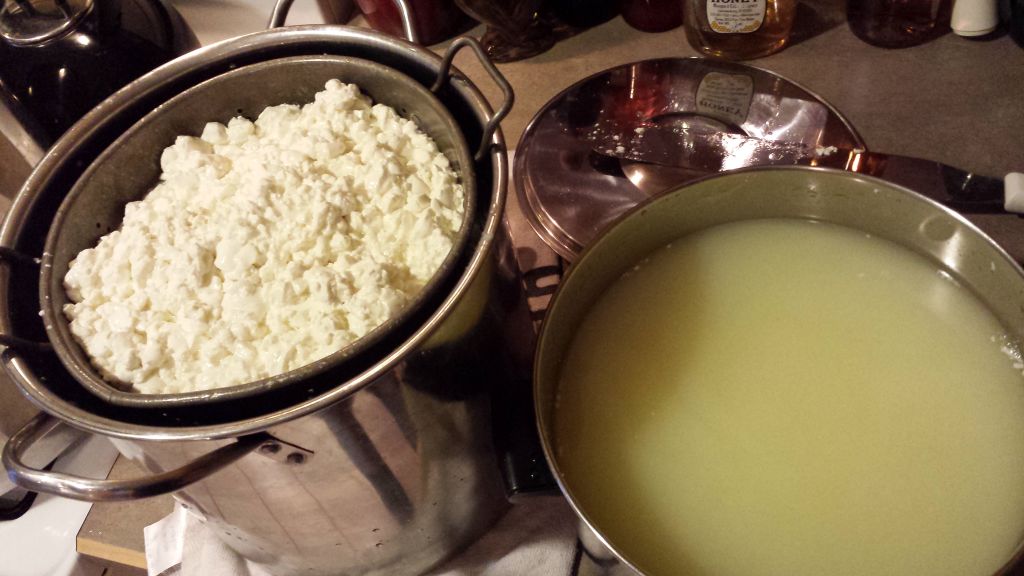
- Draining and milling the curds
- Salting the curds
- Adding to a mold
- Pressing the cheese (for hard cheeses only)
- Air drying
- Waxing the cheese (for hard cheeses only)
- Aging the cheese

Again, there are subtle variants based on the style of cheese you are making. Eventually, you’ll begin to develop your own styles. Another critical thing to consider is how you will control your temperature throughout the process. I’ve tried stove-top, the griddle method using the steam table pan… and the sink (using hot water to warm the water back up). All of it is a hassle. For cheesemaking, I now use the Anova immersion circulator and I don’t know what I’d do without it. You can really control the temperature, including holding the same temperature for as long as you need, and also manage the ramping of temperatures needed in most cheesemaking. If you’re really a techie, here’s the Anova Culinary Sous Vide Precision Cooker w WI-FI and Bluetooth
, the same unit, but has Wifi.
During the process, you will be pouring whey off the curds (usually straining through a colander). Never throw this away. It’s incredibly healthy and you can make stuff with it. I make ricotta cheese with it immediately and use it for the next meal. You can get really fancy if you want… but I simply add another quart of whole milk tot he whey… heat it to 200 F. Then, cut the heat and while stirring, pour in 1/4 cup of apple cider vinegar. You’ll be amazed as tiny white curds float to the top. The yield is pretty impressive. Strain again through a colander or cheesecloth to drain and catch the ricotta. there’s a multitude of other ingredients to make different whey ricotta’s. recipes abound on the internet. It’s pretty darned good eaten immediately while it’s warm… along with salt, thyme, and dill. Or, put it in the fridge for use over the next week.
If you go through the pics below, I detail the steps more via the photo captions
The video below just provides a few steps in the process I employed today for your viewing pleasure. Enjoy my kids in the background 🙂 What is not covered here with pictures and commentary is the end of the process, so here it is. This info is fresh off the “press” since I just did this today! After removing the cheese from the third pressing, I’ll dry the wheel on a rack at room temperature for 3 days to let it start the rind. Then, I’ll do the ever-important step that I didn’t do on my last cheese. That is, dip it in wax so that it can hold in some moisture. I’ll put it on a cheese mat and into my cheese cave (50-60F) to age. I’ll flip the cheese several times a week for the first month or so. The reason for flipping is because the whey still in the cheese will want to settle on the bottom. Flipping lets it flow back to the other side to keep the inside of the cheese aging evenly. During the aging process, the cheese develops it’s character and flavor. I may cut my wheel in half before dipping in wax just so I can let one wheel age longer than the other.
I’ll post pics and updates back here… stop stop back again soon.
See the video below for three video cuts.
- Cutting the curds after achieving a clean break.
- Stirring the strained whey to make ricotta cheese.
- Pouring the whey through cheese cloth to catch the ricotta cheese.


Great post! It takes a lot of skill, creativity, love, and patience when making cheese. It’s definitely not for everyone, but if it can be done, it is well worth it! Thanks for sharing!
Hi Caryl, Sorry for my delay in response! I’m holding out to make the next batch from sheep or goat’s milk. I think it will be all the more special later! Thanks for commenting!