I tread lightly on this terrain as this is the first prosciutto I have ever made. Not only that, but there are so many styles, and so many beliefs when it comes to drying a whole ham. You apparently can’t just call a ham a prosciutto (singular for prosciutti) because a real prosciutto starts with the right pork, is made in the right area, and handled in the proper way. The rest of us call it country ham, or dry-cured and air-dried ham. Whatever it is, I’m trying it. This ham went into the cure in March of 2014 so I’m rolling up near a year here soon! Eighteen months around the time I’ll start watching closely for maturity. More on how we’ll do that in a moment. Let’s start from the beginning.

Remove the aitch bone
First, the ham needs to be trimmed up tight. This entails carefully removing the aitch bone, and trimming the face of the meat as round and smoothly as possible. Take your time with the aitch bone. The more you stab up the meat, the more you have to remove. We don’t want punctures or other air pockets where bacteria can more easily hide during the curing and aging process.
After I cut the ham trotter and hock off, I removed the aitch bone leaving as much on the ham as I could. See more detailed pictures below in the gallery.
Also, try not to knick the ball of the hip. This will stay on the ham while it dries and is often exposed to the air during the process. Of course, bacteria can also hide in here if there are slices and knicks in the ball joint.
Trim up the face of the ham
Here, we carve the ham as smoothly as possible We want a smooth transition from the meat to the fat, to the skin. The hip bone will protrude out beyond.

You can see I had a little valley from the hip down around the underside. It was likely due to my un-perfect aitch bone removal The scraps I trimmed away were sorted (fat from lean) and into the other stacks that were heading for other products.
I have the ham in a meat lug and will keep it in here during the entire pressing and curing process. It will catch the brine and hold the juices while I re-salt and massage it.
I have seen some demonstrations where they will encase the entire ham in salt while pressing it. This ensures salt is always in contact with the face during the curing stages.
I worked and massaged the ham every day, even a couple of times a day during the process and kept it in my wine cellar. Weigh the ham and note the date in your logs.
Adding the spice and cure

The spices are only limited by your imagination, but if you have some great quality pork, as I do, then less is more!
I used kosher salt, cure 2, pepper, paprika, rosemary, bay and garlic. I also added t-spx starter culture into the initial cure to be drawn in with the brine.
The spices and cure mix are rubbed over the entire thing… favoring the face and the exposed hock end. I massaged the leg trying to express all the blood and liquid out as possible. This was a regular thing I did daily during the curing phase. I covered the lug with Saran wrap, and a used a plastic cutting board with weights on top to press the ham. See more detailed pictures in the gallery below.
Periodically, I’d uncover it, massage it some more, rub the spices and cure back on the face, and even add more salt as needed. Of course, a lot of brine was coming out. I left this brine in for now only emptying it towards the end of the curing stage.
Rinse and hang the ham to dry

When the ham comes out of the cure, you’ll rinse and dry it with some clean paper towels and hang it up to start drying. Weigh the ham and note the date in your logs. This weight will be your starting weight. We’re watching for 30% weight loss before we stucco the face of the ham.
For 2-3 weeks, I moved the ham between my during chamber and wine cellar trying to dry it, but not too fast. It’s nice and flat now from being weighted during the cure. The ham is dried from a few days of open air and it’s starting to firm up… but it has a long way to go.
Because I’m a novice, I got a little ahead of myself and ended up stucco’ing the ham before the proper weight loss. It was stucco’d for about a week or two when I un-stucco’d it to let it dry out the full 30%. It took another month and a half before it had the proper weight loss before stucco’ing it again.
Now the skin has indication of fine white mold, and there’s clear signs of dehydration, including some cracking along the meat and fat lines. This is normal.
Washing and drying

By the time the ham lost 30% of its weight, it was molded up quite a bit on the surface. I had moved it between my chamber and cellar a few more times just based on feel.
I had to clean it off real good before stucco’ing it. For this, I use a dedicated, clean nylon stiff bristle scrub brush. In the sink, I ran lukewarm water and used the brush to scrub the face clean again. Once clean, it was hung back up to dry.
You don’t want to stucco the ham while it’s wet from washing. In my case, I washed it, hung it up for another week or so, and waited until the surface looked and felt dry.
Of course, all the while, I’m hoping that the right amount of cure made it inside the ham since there’s no other way to tell from here.
While the appearance is quite ugly, it’s also kind of beautiful… if you know what I mean.
Stucco the ham
I render my own lard from leaf fat I get from the pigs. It’s an easy crock-pot thing you can do during a day you are milling around the house.
The lard, pepper and rice flour and mix together to make your stucco. To make the stucco, use a 50/50% lard rice flour mixture. Add some black pepper to help keep flies at bay. We do this so that the meat on the ham does not dry out so much that it penetrates deep into the ham. The face of the ham will be trimmed off when it’s time, but we want that to be a minimal amount.

After a week or so hanging with the stucco on it, I moved the ham into my drying chamber. Here it’s 80% RH, and that may be a little too high. Hence the reason I tend to move it from the dryer back to the wine cellar. I really go by feel. The feel of the skin, and how it compresses when I squeeze the thickness of the ham.
Mold was starting on the stucco. I plan to leave it go for a while since I see mold on most of the prosciutti’s I see aging. I suspect if it gets too bad, we could clean it off and re-lard, but for now, I’ll let it be.
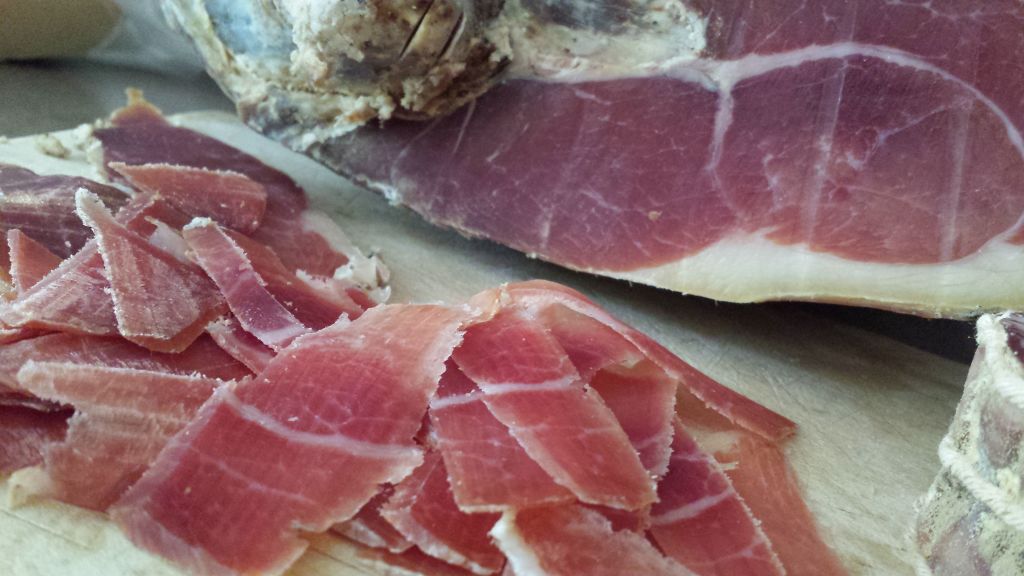
I have procured a osso di cavallo that will be learning how to use. It’s a horse bone… specifically the shin splint from a horse. Traditionally, it is used to puncture the ham through the lard and pull out the aromas that are happening within. This of course is a learned art, and I am on the beginning of it. I have the bone, but have yet to shave and polish it to the proper finish to begin using. Check out the pics. After 15 months of drying, see the sliced result below.


Leave a Reply