More and more, I try to find ways to produce my own food. We have a ways to go before we’re completely self-sustaining, but through each experience, I feel more informed, more prepared… and just more satisfied. For me, meat from the store has been just plain disappointing. I question everything from how commercial animals are raised, handled, the ingredients and preservatives within, and even labeling. When I cut open a package of chicken, I sigh not knowing anything about it. After processing my own deer, and hogs from local farmers to make my own pork products, processing chickens seemed to be the next logical step. While I’ve not yet had the experience of raising my own meat birds, I am in my second season having egg-laying chickens. I am also setting up to allow more space for meat birds in the future.
In the meantime, my very good friends at Funny Farm and I shared a collaborative effort. Collaborative meaning, they raised them, and kept track of the expenses. Later, we split the costs and teamed up to work on slaughter day. It’s my intention to document our experience here. This is not a detailed step by step tutorial. If you want that, this is a great book, and I use it for other animals too. Here, I simply mean to educate the first-timer, or one who’s been thinking about setting up and processing their own meat birds.
Whether you have layers, or meat birds, ideally, you have some space to let your chickens run around. My layers are still in a coop, mainly for protection. It’s been a goal of mine to fence in some space to raise these chickens right. In my case, the fencing is to keep other dogs and animals out. Meat birds also take a different kind of feed than layers and there are many philosophies on feed from one person to the next. Backyardchickens.com is a great resource to answer many of your questions.
To prep for slaughter day, prepare the area. You need designated “dirty” and “clean” areas. This is important. I always clean as I go and take sanitation during any animal-processing effort very seriously. Stopping and cleaning up an area periodically when needed should be part of the process. I’m more used to handling big game, so cleaning up during and after chickens isn’t as much of a chore. Although, I admit, I was busy parting up chickens when my friend worked the outside clean up.
Preparation for slaughter day starts a day, or even days ahead of time. Adjustments to diet, and withholding of food to make the chickens not as full are key. Hopefully, they are not stressed, and of course, raised in a happy environment. As more people begin keeping chickens, and other livestock, I’d like to think that the happiness of their animals is always paramount. After all, we have the luxury of doing it our way, the human way, because the only quota we have to meet is our own.
Next, our happy chickens find their way into the killing cones on slaughter day. We catch them, hold them upside down by their feet and lower them into their cone. The birds turn quite still once upside down. My best understanding is that the blood rushes to their head and makes them dizzy.
My friends allowed me the honors of taking the first bird… which coincidentally was my mean roo, Mr. Rooster. Sometimes I ask myself how the bird commanded enough respect for me to call him Mr., but… it was a running joke about him being so mean to me that I would see him in a stew pot… and that day finally came. I have to admit, it made it easier to take him out. He’s on ice right now, and I plan to make a special recipe with him. That’ll be another story.
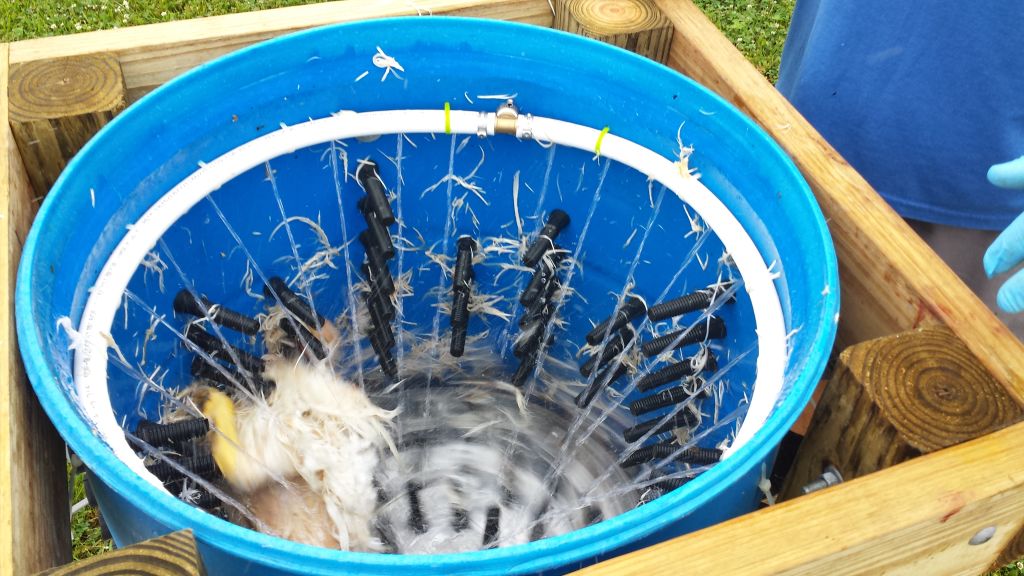
Lining up bins of ice water, towels for wiping, and various stations for certain tasks is critical. My hosts did a fine job, and the addition of the Whiz-bang chicken plucker similar to this one was a time-saver.
Here’s the process that we followed to process 25 chickens.
1. Place the bird in a killing cone (see pics), and cut the jugular(s). We didn’t pith the birds this time, and we just let them bleed out. Pithing is said to relax the follicles and make dry plucking easier. Since we were working towards efficiency, we used the whiz-bang. I can see doing this once or twice a year, so it was important to refine a repeatable process.
2. Once the bird bleeds out, it will stop moving. From there, we moved it to the scalding station. Here is where your water is heated to approximately 132 F. Dip the bird in head first, and move it up and down for 2-4 seconds, and pull out (like a tea bag) and then dunk it again and so the same. Bring it back up and do a test pluck. The feathers came out easily each time for us. (Note: On one bird, I let the water get a little too cold and did my dunks. The feathers didn’t pull out easily, even after I heated the water up again and repeated the process. This bird in particular was difficult to pluck. So, maintaining the right temperature is important).
3. Next we moved the bird to the whiz-bang. We turned it on, put the chicken in, and sprayed it with the hose to wash the feathers down as they came off. It worked beautiful. You only need to run it for 5 seconds or so. You don’t want to beat the bird up, so stop it and check the progress. One or two 5 second runs, cleaned all the feathers off well. (see pics)
4. Give the bird another quick wash with the hose and drop it in the prepared bin of ice-water to chill before evisceration. Move to the next bird.
When all birds are on ice, we move to evisceration.
5. We first cut off the feet using a meat shears. across the hock joint. This is easy to separate using either a shears, or a knife. We cut off the preen gland that is near the tip of the tail. We removed the head, and cut a slit down the neck to remove it. We separated the crop and esophagus, then the bung and the intestines. We toss the livers, gizzard and hearts in a designated cleaner bucket for later. We removed the remaining entrails, lungs and were careful not to break the cloaca. After a couple of birds, it felt very natural, and reasonable for anyone to do. Experience makes you better and I found myself in a process after a few birds.
6. The bird gets another rinse, and then it goes back in to a different, cleaner bin of ice water until parting. While the birds are in the ice water, it gives us time to clean up, properly sanitize, and prepare for the next step.
7. Now we clean the gizzards, hearts and livers. There’s an easy action to slice open and peel out the lining of the gizzard. A final soaking in salt water will keep them until they are rinsed, froze, or sent to where they’re going next.
We now move from the dirty area, to the clean area. Here’s where we line up the vac sealers and a couple cutting boards to finish parting out and getting them ready for refrigeration. Of course we left however many birds whole for roasting. Others were separated in to thighs, wings and breasts. Carcasses are great for boiling down into stock. My vac sealer allowed me to compress several carcasses in one bag. I also saved the feet for stock. I cleaned, blanched and peeled them before vac sealing and freezing for later. Apparently, there’s more you can do with the feet, but I’m satisfied just not letting them go to waste.
Important: Do not freeze the birds until after 12-24 hours. The dryer you can get the birds, the better. You can lay them out on racks, and even set up a fan to blow on them. Once dry, keep them below 40 degrees F. It allows the skin to tighten, and decreases the amount of water uptake. All this contributes to more tender chicken later, and also reduces microbial growth. If you do not have the space to hold at 40 degrees before freezing, then leave them in the cooling tub for 6-8 hours.
While the process sounds like it would be a bloody, nasty mess, it was quite the contrary. As you’ll see in the pics, the most blood you see is from the initial cut of the jugular to bleed the bird. The squeamish may have more issues than blood, but knowing the quality of the food you are making and consuming makes it easier. It’s also nice to get a couple of people with the same interests together and share the work. For me at least, it didn’t even seem like work. I look forward to doing it again, and I thanks my hosts for taking me through the process.
Enjoy the pics below!


[…] If you think about it, the machine is a simple idea… and minding some craftsmanship, it came together like a song. There’s a few minor adjustments we’ll make before using it again, but it worked great on its maiden trial on 23 chickens. […]