After enough years of cooking and smoking meat, it’s natural for one to venture into the world of curing and drying meat. The art of charcuterie has been around for ages. In Roman law, there were regulations that governed the trade of charcuterie and the French had a profound impact on perfecting it. Charcuterie was a way to preserve meat and give a longer shelf-life before refrigeration. Charcuterie often utilizes the offal of animal products in the form of pâtés, terrines, sausages, bacon, rillettes, trotters, head cheese, and more. I have to admit, some of the things sound pretty crazy, but I’ll try about anything once and I’m a believer in leaving no waste when I take any animal.
Today, hobbyists like myself and others take up the art of charcuterie to attain the flavors derived from this old preservation process. In the coming years, I plan to be processing many of my own animals and so one thing I needed was a drying chamber. In the proper climate, meat drying can be done in a variety of locations. However, my location requires that I set up the ideal climate, and the one I’ll be showing you today uses a modified, frost-free refrigerator to control the two most important factors in meat drying… temperature and humidity. It’s important that the refrigerator is a frost-free model. I have read that if the shelving is coated (vs. bare metal) that they are usually frost-free, but you will want to check to be sure.
There’s plenty of information that can be found on the internet on how to do it… and here’s my take. After a little bartering with a friend, I found what I think may be the perfect type of fridge for the chamber. A fridge with the freezer on the bottom, and the bottom being a door and not a drawer. I suspect a drawer-type could work, but being able to situate things in the bottom (below the meat) and having clear access is the plus.

Step one:
Clean your refrigerator with bleach and water. Get scrub brushes, toothbrushes and anything else to clean in all the tight spots. I took every piece out of the refrigerator, including the metal brackets on the walls that hold the shelves and I cleaned everything. After all, we’ll be hanging meat in here for long periods of time, so it makes sense that we should clean every inch of it. I also cleaned behind and underneath… where I discovered a mouse once lived.
Also, remember that when a fridge turns on and cools, it condenses moisture out of the fridge. So, it drips out a tube behind into a tray. I took this tube and extended it and ran it to a drain so that I wouldn’t have to worry about any water overflows.

Step 2:
Once clean, we’ll make the modifications. The first step is to cut a hole through the wall of the upper and lower chambers to join the two into one. This is the most tedious part of the process. Do know that there are things in this wall that you do not want to cut and damage. I had a friend over for the weekend and the two of us took care to do it right. We traced the size of the opening we needed with a pencil. Then, I took a Dremel tool with my whiz-wheel attachment and cut just through the plastic shell… being careful not to go too deep just yet. Just beneath this plastic layer is thick foam. Embedded in the foam are wires, and in my case, copper tubing. By getting the plastic shell off, we used a razor knife to slowly cut down through the foam. Using a metal putty knife, we were able to pop pieces of the foam out a little at a time making sure not to disturb the inner workings.

Step three:
Time to clean out the debris and give it another good cleaning before we mount the needed equipment and hang our top rack where we’ll hang things to dry. I went around the sides and trimmed off any sloppy cuts and scraped the foam off the copper tube and the exposed wires.
Once cleaned up, there are many ways to cover the foam. I have seen people who have access to stainless steel to dress it out real nice, but I just ordered some white food grade silicone and covered it over. (More pics at bottom) I also covered the exposed wires with the silicone. The hole is to turn both chambers into one. Below, we will be placing a fan, some electrical outlets, and an ultrasonic humidifier. Having all this in the smaller space below the meat is what we want.

Step 4:
Next, we need some power in the box so that we can plug things in. Many solutions I found on the net ran all the wires out the fridge (many through the gasket of the door). The one requirement I had was to not disturb the door gasket since I want to control the climate inside as best as possible. I wanted just one wire coming out to keep things simple and neat. So, I bought a 4-gang electrical box with a cord at Lowes. I cut the plug end off so that I could run it through a smaller hole out the back of the fridge. Conveniently, this fridge had a hole in it already (covered by a sticker and ready for the installation of an ice-maker in the bottom freezer area. Worked perfectly. I mounted the box in the bottom part of the fridge, ran the cord out the hole in the back, then, I mounted a new plug end on the cord. (More pics at bottom)

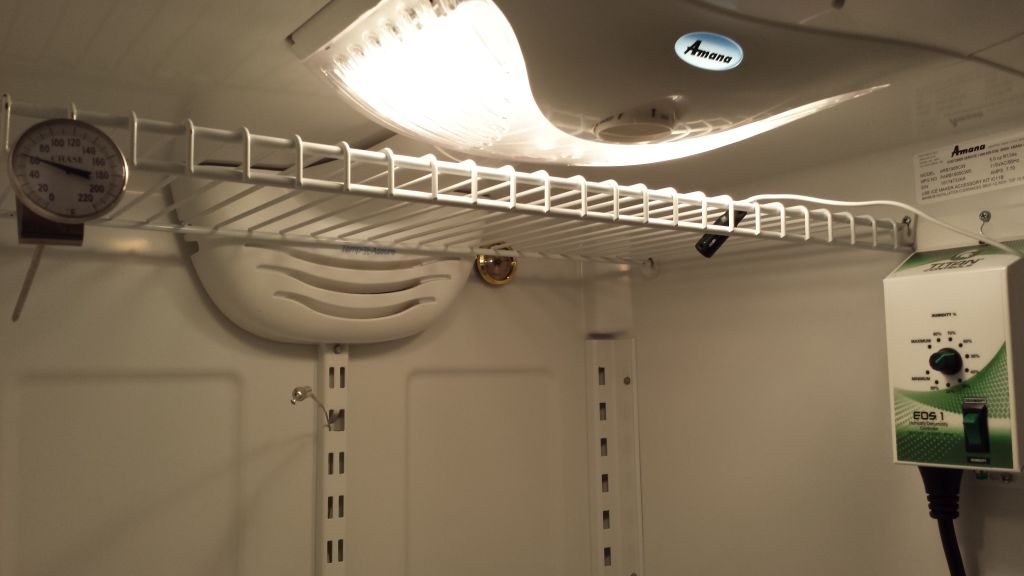
Step 5: I opted for the Titan EOS-1 humidity controller. I mounted it in the top chamber where the meat will be hanging and used clips to keep the cord in place as I ran it down to the bottom chamber. The plug end has another outlet on it that allows me to plug in the humidifier. The controller will turn on and off the humidifier as necessary. The ultrasonic humidifier is important as it will immediately add humidity into the air when the controller turns it on. It will also use the water much slower than a regular humidifier. Note, use distilled water in the humidifier to reduce buildup and keep things more maintenance-free. I have heard feedback about non-digital controllers being difficult to dial in properly. That is probably true. I spent a good amount of time with the knob setting it to be right. I also realize that once we hang the product in the fridge, it will add humidity quite a bit. Keep in mind, you will be adjusting things later on depending on how much is hanging in the chamber.

Step 6:
Next up is a temperature controller. I opted for this basic Johnson Controls temperature controller and cost about $60. It’s been working very reliably. It has a cord that plugs in, and just like the humidity controller, it also has another outlet on the plug end that the refrigerator plugs in to. I mounted the temperature control unit on the outside of the fridge and only the probe runs inside via the same hole that the power cord from my electrical box comes out. Set the refrigerator on its lowest temperature setting. If you have two different dials (one for the fridge and one for the freezer) set them both on their lowest setting. Not, when you adjust the temperature on the controller, it will cycle the fridge on and off keeping the temperature constant. I have burned this in for a month while I was messing with the humidity control, and the temperature has been spot on. The fridge does not even need to turn on and off very often. Literally, no problems thus far with temperature control. Now, humidity control is another story.

Step 7:
Finally, I drilled a hole through the front door that allowed me to fit the probe in from the digital display on the front of the fridge. I used this Extech Hygro-Thermometer for my purposes.
It’s so important that temperature and humidity are monitored during the meat drying process. Depending on what you are drying, whole muscle or meat stuffed into casings, it’s important to make sure the outside of the casing does not dry and harden. This effectively seals off the only area where the moisture inside the product can escape. Here is where the harmful bacteria come in and can not only spoil the product… but kill you. Let’s avoid botulism and other unwanted nasty’s by considering all we need to consider ahead of time.
I spent a good deal reading before venturing into curing meats and you should too. There were a few good books I’ve read, and these two Charcuterie and Salumi by Ruhlman & Polcyn are very good.

Step 7:
Here we’ve hung a rack up top that will be used to hang various products in the chamber to dry. I chose a rack so that I had a lot of options when fitting different products inside.
Also, notice the temperature probe coming out the top of the center bar running vertically up the back of the fridge. Above and to the right is an analog hygrometer on the back wall. It’s great that we have a digital reading on the front of the fridge, but it makes so much sense to have another reading that we can look at when we open the door. I can say that both the digital reading and the analog dial inside have dramatically different readings from each other. So, I bought a cheap calibration kit to test the readings.

Calibrating humidity instruments
The Boveda humidity calibration kit was like $7-8. It has a wet-nap looking pouch that you place in the provided bag and guarantees a humidity of 75% in the pouch. I placed the analog dial, and the probe of the digital instrument in the bag and let them sit for 48 hours.
At 75% humidity, the analog dial read 82% and the digital instrument read 71%. It’s kind of sad really… so, I have to note those differences and take them into consideration when taking humidity readings from either one.
So, that’s about it. I let this setup “burn in” for about a month. During that time, I have made small adjustments to the humidity controller to get it to where I need. Again, I realize that once a product is inside, there will need to be other arbitrary adjustments. As I also mentioned, temperature control is perfect so far. I attribute this to leaving the gasket of the doors intact. Keeping some circulation in the fridge is also important so I put a small fan in the bottom of the fridge that will kick on and off by a timer. The rest is just tweaking things as they come.
I will report back after I have a product in the chamber. See the pics below for more detailed pics of and explanations of the process.


Hello,
dont you need any holes in the fridge for air to flow?
Hi Marcin, Actually, I have a few holes for probes to go through and I didn’t seal them up. Additionally, I have a fan inside that kicks on and off with a timer. I figure, I can always add more holes and install fans, but so far, it’s all good. Just took out my first coppa that turned out real nice.
Hello. I tried with a fridge for wine bottles.
But there is a problem :
I have a humidifier with integrated thermostat in the apparatus.
However, these humidifiers are made for living quarters. The fridges are small. Even putting the humidistat on 50%, 60% or 70% I still exceeds 90%. Not possible to fix de humidity level….
I know just what you mean… I have a small wine fridge for cheese… and I fight with the humidity just like you say. The bigger the space, the better. It makes it so the outside environment doesn’t have as extreme affect on the inside. What I do now for my little cheese fridge is put the wheels in a container with a lid. That traps in the moisture, and it holds a pretty good humidity. I confirmed it by putting one of those little humidistats inside with the cheese. Save the fancier equipment for a larger space.
Jason, I’m in the process of constructing a curing chamber and it looks like I have the exact fridge that you have… Do you have any advice on how to cut the hole connecting the freezer and fridge? If possible, I’d like to avoid exposing the copper tube and have a smaller opening.
Hi Steven, sorry for the delay in response. Yeah, this is tricky. Since you can’t rely on the tube being in the same place, I recommend starting with a razor knife. I literally drew the rectangle where I planned to cut with a pencil… then used the razor knife to get through the plastic shell first. It’s not very thick. Don’t let your blade go through all at once. There is styrofoam below it. Once you pop out the shell, you can use the same knife and work your way through the foam the same way… picking it out and slowly revealing whatever may lie beneath. Thinking about your smaller hole… consider the fact that you want good circulation and the humidity to easily get up into the top… so, you might make the hole bigger. The tub really isn’t an issue other then aesthetics. Hope this helps.
Really nice informative post. I plan to use a vertical freezer, will it be suitable for this use?
Yes Max, that should work just fine! Modified of course. Good luck and keep us posted!
I should note… you want to use a frost-free freezer. That’s important.
What did you use for heating if temperature gets to low?
Heat is never a problem in this application. It’s set for cool only. It would normally try to equalize at room temp (around 72F) and so the fridge would kick on to get the temperature lower to the desired setting. I normally keep it around 60F… and sometimes I’ll set as low as 50F.
Jason…Good day to you and thanks for information on how to build a drying curing chamber. I plan on getting back to making sopressata and sausage. Currently, I’ve been making jerkies in dehydrator and smoker. Do you have information on proper way to make Sopressata? At age 53, I’ve seen may variation of old tradition as a kid. They have passed since. Also, do you know of any courses or certification for Charcuterie or Salumist? I live in Pittsburgh, Pennsylvania. Thank you very much.
Hi Carlo. I frequent a couple groups on Facebook. Look up the ‘salt cured pig’ and ‘salumi, charcuterie, wurst” two excellent groups where I draw a lot of inspiration and knowledge. Honestly, these two groups have pretty much taught me everything I know along with a couple books. They’re both very valuable and people are very responsive to all your questions about charcuterie. There’s plenty of recipes and variations for soperasatta too.
Thank you Jason