
Lately, I have been curing what’s in season, and right now, it’s hunting season so this series of posts will feature venison. All of these products are cured. It requires an environment where you can reliably control temperature and humidity. Once you have the environment, and the basic knowledge of safely curing meat, the recipes are up to your imagination.
Here, we’re talking venison landjaeger. See also, cured deer heart, and venison bresaeola.
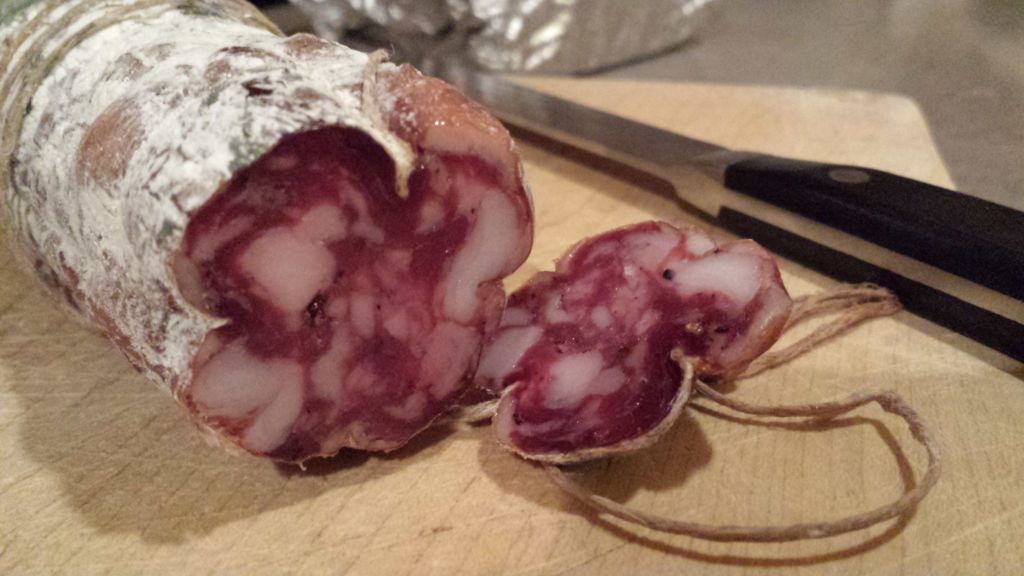
Venison langjaeger v2. This is my second attempt. The first, seen at right, was excellent and it was made using Hank Shaw’s recipe. This time, I wanted a larger caliber sausage and I also wanted to play with the ingredients. Instead of the hank casings I used in v1, I tried beef middles. The larger caliber and weight required me to truss them up. And last, I doubled the batch to 10lbs. since I had a lot of venison.
- 8lbs. venison chunks
- 2lbs. pork fat back diced (Stick to fat back here, and save your leaf fat for the lard.)
- 76g kosher salt
- 30g dextrose, or white sugar
- 12g pink salt #2
- 2 tsp. garlic powder
- 2 tsp. caraway seed
- 2 tsp. ground coriander
- 1 tsp. celery seed
- 4 tbsp. ground black pepper
- Optional: 2 tsp. ground habanero powder
- 1 tsp. T-SPX starter culture (Diluted in 1/2 cup distilled water. Important, chlorine-free water.)

Just like fresh sausage making, you want to have your equipment (stuffer, grinder, trays, etc.) and the meat and fat very cold! Your venison should be trimmed and cut into chunks along with the fat back.
Take your chosen casings and soak them in lukewarm water. I’m using middles in this recipe, and I took more time to clean them out by running water through them multiple times.
In a cold tray (I prefer metal trays to help stay cold from the freezer) mix the venison, fat, and all of the spices, but HOLD OUT the T-SPX and water. Put everything into the freezer until it starts to freeze, but not frozen. The colder the better.
When ready to grind, grind through the course die. This is really a preference but I don’t want to overwork the forcemeat. I’m also looking for a courser texture in the final product. Once ground, place back in the freezer to chill it up again. It should be cooler than 42 degrees F.
While the forcemeat is chilling, prepare your starter culture by mixing it with the distilled water. Let it sit for 15 minutes, stirring occasionally.
Remove the forcemeat from the freezer and add the starter culture, mixing very thoroughly. If you have a meat mixer, use it. Otherwise, use your hands, and fold it over and over until you notice the formation of the pellicle (this is when the meat starts getting sticky, and binding together)

Now it’s time to load your stuffer and stuff into casings. Whether using hank casings, or beef middles, stuff them and tie off each link with hemp rope or twine. Using beef middles, tie two knots between each link because these will need to be separated and hung individually due to their weight and size.
Prick your sausages thoroughly and massage the air bubbles out of them. If using pork casings and the smaller caliber, the traditional step to take here is to place the sausages between two trays (traditionally wooden) and press them tightly together so they form more of a square chub (like the picture above.)
Now, we will ferment the sausages. We want to let them sit between 75 and 80 degrees F for 24 hours… up to 48 hours if you want to. This let’s the starter culture get to work. During this time, you need to prevent case hardening by keeping the casings moist. I use a spritzer bottle and spray and turn the sausages several times during the process. Another thing I tried this time around was to pre-mix my Bactoferm Mold-600 with distilled water to fill the spray bottle with. I use Mold-600 on most of my sausages in the drying chamber just to give the sausages a head start on developing the good mold and I had this handy. Update… it does work. White mold started pretty quickly, even as it was sprayed during cold-smoking.

After fermentation, it’s time to cold smoke. I suppose you could skip this is you want, but after my first successful attempt, I require it. I used cherry smoke this time around and I smoked for 4 hours. The idea of cold smoking is to give your sausages smoke flavor, and not to cook the meat. I keep my smoker between 80 and 90 degrees F, and never hotter than 100 degrees F. This usually requires the use of a cold smoke generator as it would be difficult to keep your hot smoker under 100 degrees F. I made this cold-smoking device and I use it in my hot smoker.
Finally, it’s time to dry your sausages by hanging them in your drying chamber… or the proper environment. My dryer runs at 60 degrees F, and 80% RH. Of course, if you are using smaller casing, such as hank casing, it could take anywhere from 2-3 weeks. A larger caliber will take longer, and also require more careful monitoring of the casings to make sure they do not get too dry and hard. Case hardening is a critical issue in all meat curing. If the casing is left to harden and dry out, it looses it pores, and does not let water moisture escape through the casing. The result can be botulism.


[…] we’re talking venison bresaeola. See also venison landjaeger and cured deer […]