See the full gallery with many more pictures on BackyardChickens.com
I thought about chickens for almost three years before finally jumping in. Mainly, I wanted to make sure I properly integrated them in to our lifestyle. Having several friends who assured me they were easy and fun surely helped speed up the process, but still, it was important to me to choose and build the right coop and assess all the other issues that might arise with chickens. There is feeding and watering, protection from predators, free-range, or coop? Should I build a chicken tractor? How do I set them up when I go on vacation? I tried to think of all I could so that there would be less surprises. So far, so good. It seems I’m always making a change or addition to the coop, but I started off with a “Cabin-style” coop. I made it out of all recycled materials and either scrounged or bartered for them. Here, I document the process. I don’t go through detailed instructions on how to build a coop, but I show how I address the basic concerns. BackyardChickens.com has a gallery of small, medium and large coops and many people have provided their plans. I found inspiration there, and then set off to build a coop of my own.
Location and foundation
I wanted to tuck the coop in to a place where they would be least disturbed. I actually settled for an area on the hill near my bee hives, behind my shed. Since it was on a hill, I needed to dig a platform on the hill to make a level spot. Drainage was of course a concern that I’ll touch on in a bit.


Next, I used cement blocks to make the foundation. I created a makeshift footer using the blocks that I’ll try to illustrate in the following pictures. The first row of blocks were leveled and stood up on their side to create sort of an underground wall to prevent coons or other animals from digging under the coop. Below these blocks, I laid down regular chicken wire to prevent any of these digging animals from coming up under the center of the run.


I back-filled around the block walls on both the inside and outside walls to hold them in place. Ultimately, I will fill the inside with sand, so it wasn’t so important to stabilize these blocks any more than just enough to keep them standing up. Once filled, I laid blocks down flat on top and this became the foundation that I built the structure on.

Next, I set blocks laying down around the perimeter to make the foundation that the structure will be built on. I is important to make sure things are level so that the structure sits comfortably on top.


Again, ultimately, sand will fill the inside of the run. Before I got the drain tile ran around the outside perimeter, rain totally filled up the center proving that drainage would need to be addressed.
Framing it up
I put the word out to friends that I was looking for lumber and picked it up where ever it was available. I tore down a swing set and pressure washed it all. After I had a significant scrap pile, I began making the plans for the framing. Turns out, I got a lot of 4×4’s to use instead of the 2×4’s that were originally planned for. The coup is pretty stout as a result. Here’s some of the wood that looks almost new after it was pressure washed and I got all the nails and bolts out.


Drain tile
Once I started the framing, we got a few good rains that washed water right in to the run. It was a small pond. So, I decided to start the drainage plan before I got too far along. I grabbed the spade and pretty much shaped out a good trough to lay the pipe around.


Keep in mind that until you actually fill it with gravel and complete the drain tile, it’s not really good at catching the water and diverting it into the pipe. By back-filling, you create resistance… and of course, water seeks the path of least resistance. The perforated drain pipe becomes the only place the water can go. I got it filled and during the first rain, it proved it was working. Water was coming out both ends of the tile and routed around the coop and down the hill.
Next was to keep framing. As such, I needed to plan for windows, but still needed to get them. I traded some wine and honey with a local farmer for three windows, and the tin for the roof. Big score. Another good friend came over with the plywood for the roof. It was being tossed at a job site that he was working at and it was just enough for my 10×12 roof. Again, very helpful to put the word out to all your friends to let them know what you’re doing. There was more than one occasion where someone showed up with some materials to donate.

Notice the floor of the coop at left. That was made from wood of my neighbors old deck. He had replaced the deck or something and had some really long 1×6 he was going to burn. I scraped it up in time and put almost all of it to use by the end.

Once I had the windows, I could finish out the roughing and complete the framing. The siding was cut up plywood that actually came from Fernald 🙂 A friend of mine had it lying around, and it wasn’t much good for anything beyond a chicken coop.

The wood that is painted red above (also from the decking wood that I got from the neighbor.) Looks good as new now, huh?

I also doubled up the rails around the run knowing that I have plenty of dogs and coyotes around that will eventually try to get at them. All of this 2×4 material was donated by another buddy who had piles of 2×4’s that were no longer then 3 and 4 feet. The wood had a lot of nails that had to be pulled. He said the wood was left over from a large foundation job where the 2×4’s were nailed together to hold the cement forms. Again, everything cleaned up nicely.

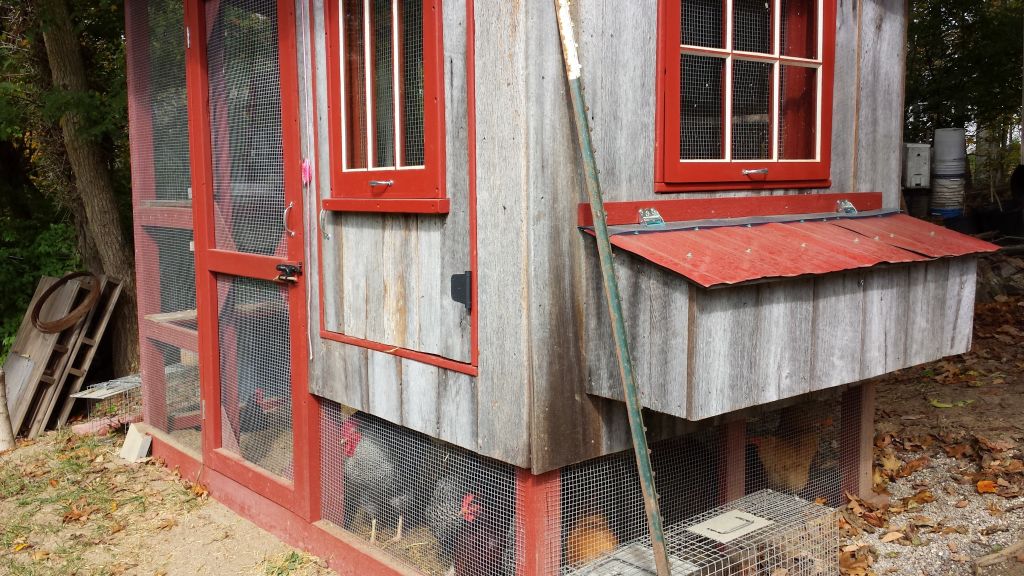
I added nesting boxes on two sides of the coop for a total of seven boxes. Four boxes on the long side and 3 boxes on the short. Many of the cabin coops I found online only had one set. I figured it was easy enough to add boxes on two side, so why not?

Adding the barn-siding
Got the coop painted and the hardware mesh up. I chose 3/8″ mesh so that possums and raccoons could not reach through and get at the chickens. Kind of funny that traditional “chicken wire” (the pentagon shaped wire) is not really that great for chickens. It can certainly keep the chickens in, but it can’t keep greedy hands out. Coons are known for reaching through that wire, grabbing a chicken and pretty much eating a hole in to it right through the wire. So, I opted for the smaller, stronger 3/8″ wire mesh.


Notice the door to the run is nothing more than a frame of 2×4’s that will also use the 3/8″ hardware mesh. So a door to the run, and a door to the coop for easy cleaning are essential to the “cabin-style” coop.
Refurbishing the windows
The windows are just as you would suspect… rickety and wobbly. I needed these to be tight so I could control the ventilation in the coop. I also needed them to stand up to the elements that I know are going to be pounding on them. There were three windows and a total of 21 panes in all that needed to be re-glazed. Window refurbishing happened on rain or snow days in between the framing.

I chiseled out the old glazing, removed the panes of glass and cleaned and scraped those separately. I stripped, scraped and sanded the windows and prepared them for painting.

The green window above has no less than 7 layers (all different colors) of paint that I counted. The window was painted over and over with no sanding or preparation. I used a stripper that made pretty quick work of getting the layers off, and also made it easy to see the different colored layers. The glazing on this window was also once treated with caulk. It was a total wreck.

But then, a total transformation. All three window panes needed a serious amount of work, but in the end, you can see that all of them look like they belong together and the barn red color just pops. Some of the windows needed some girth planed off them to fit freely in my rough-ins. In the end, I had three very custom windows all painted red and treated the same.

Just to add a little color when the sunlight comes through (and I broke a few panes of glass when I was cleaning them) I decided to brush up on some stained-glass work. I made a few panes that used mostly scrap stained glass I had laying around. It allowed me to brush up… and also use some glass that otherwise may have been tossed. The following series shows some of the panes I created.


At night, the light inside the coop shines through and it looks really good. The picture does it no liberty.

Notice the top of the nesting box. The was the same style tin roofing that is on top, but there were some red pieces for the picking. I took these and pounded out the ridges to flatten them out as best I could. These were then screwed on to the top of the tar-papered lid and fitted with screened door hinges. So, it’s springloaded and wants to shit when you open it. I also use a basic hook and loop to keep coons from getting in.

I got the chickens in the coop and it only took them a day for them to get used to it. The sand in the run offers so many benefits. People buy and feed grit to the chickens. While I haven’t read extensively about it yet, they need some grit in them to help grind and digest their food. Having sand in the run offers a number of conveniences… as food falls in the sand, it also gets in to the chickens in lieu of the grit. Also, as the poop, it acts as a litter box. My original intention over the summer was to periodically sift the sand using a simple frame with 3/8″ hardware mesh under it. Scoop the sand from the run and add to the box, sift out the manure as any other larger matter and throw it in the compost. The fertilizer I pulled out of the coop this year is unbelievable.
I have many more pics, including the hens being introduced to the coop as smaller adolescents, listed in the full gallery on BackyardChickens.com.


I spent some time tweaking things after the coop was up and the chickens were in. The feeder and watering system were also made out of reclaimed materials. I use the deep litter method in managing the coop inside. Sometimes, I just rotate all the manure on top in to the straw on the floor and I can go 3-4 months without pulling anything out. When I do, I compost it in my compost pile. Before the winter hit, I layered a lot of the sand straw and manure on my garden. It will be turned into the soil when I prep the garden to be tilled.


I also had a scrap piece of gutter that I used in back of the coop. Today, this gutter runs in to a rain barrel set up that stayed full most of the season. While a complete after-thought, the rain barrel worked out well. I ran it to some soaker hoses that went around the grape rows lower down the hill. Takes 2 days for the water to soak out of the barrel.

The chickens are very hardy. The coop is tight with wood, tar paper and barn siding. I have a few vents in the top front and back of the coop for mild ventilation. During the bitterest cold days over the winter, I left the pop door open and provided no heat to the coop other than a bulb that stayed on until 10pm. The chickens slowed down laying to about 4-6 eggs a day. There are a lot of thoughts on heating a coop, and my decision was to keep the drafts down and the coop dry and reasonably clean. So far, all has been OK. Check back in the Spring and we’ll do a coop clean-out. I’ll provide an update on what worked and what didn’t.
I know I blazed through everything. If you have any questions or comments, just add them below. I’ll be happy to reply and tell you anything I know. In all, I think I had about $200 in the coop. That was for various hardware, screws, a few boards, window glazing, and some of the perks that I decided to add. For the first year, I am blown away with the amount of eggs, and fertilizer I got from the chickens. Without a doubt, well worth the investment. I give the eggs to family and still have some to sell at the market a dozen at a time. I sell eggs for $2 a dozen, and for each dozen sold, a dollar goes to each of my kids. This was just an easy way to fund some allowance for their banks and it gives me good reason to involve them when I can.
See the full gallery with many more pictures on BackyardChickens.com


Great post! I’m planning on building something similiar in the future so you gave me a lot of good ideas.
Nice job! just learning what to do with chickens. Thx for posting.
Wow! This is amazing. What a great tutorial. You are a wonderful builder! I was especially impressed with your work on the windows.
Great job and thanks for the step-by-step pics.
Trying to get ideas for my coop build! Inspired!
Emily
Thank you. Our goal for the website was always to excite and inspire. Take care!