AllMorgan

Visit us on

  • Email
  • Facebook
  • Instagram
  • LinkedIn
  • Pinterest
  • RSS
  • YouTube
  • Home
  • About
  • Beekeeping
  • Homesteading
  • Winemaking
  • Genealogy
    • The Morgan Family Today
    • Getting Started in Genealogy
    • Favorite Genealogy Links
  • Store
You are here: Home / Archives for how-to

Broody hen adopts 8 baby chicks

April 2, 2016 by Jason Leave a Comment

Here’s a story of adoption on the Morgan Ranch. In this quick article, I’ll describe the steps I took to introduce 8 baby chicks to a broody hen.

My Buff Orpington’s have been the broodiest hens ever since I dispatched Mr. Rooster. I honestly can’t be for sure that it’s been the same hen… but it’s been the Buffs each time. There are periods where one of them ends up in the nesting box for weeks on end. Since I employ faux eggs, these broody hens end up sitting on warm, wooden eggs. Briefly, the use of faux eggs has worked just as intended. If you keep taking a hens eggs, they begin to think that something is getting them and ultimately deem it an unsafe place to lay eggs. Since the coop has only so many nesting boxes, you don’t want to have the hens thinking it’s unsafe to lay eggs in it. The hen’s think fake eggs are real and they will come in and lay fresh eggs among them. I end up taking the real eggs, and leaving the faux eggs in the boxes. This process works well.

Another Buff took over the nesting box with the most faux eggs. I chide “you’re sitting on fake eggs… they’re not going to hatch!” But, she ignores me… and keeps sitting. This was a week or two before I left town for vacation. When I got back, the hen was still in the box. I picked up 6 new chicks the weekend I returned and set up my brooder box. After a week or so, it occurred to me that the poor broody hen in the coop sure would like to have some baby chicks. So the light went on in my head and I thought, I need to introduce these chicks to a momma.

I don’t know why… but I ended up going down to the store and I grabbed three more baby chicks… of another breed. So, now I had 8 checks of three different breeds… and 5 of them were a week old already.

In the morning, when all the other hens were out of the coop, I closed the pop door and introduced the first chick under the broody hen. I just opened the nesting box lid and quickly and quietly dropped the chick in behind the hen. No voice and no noise. She took right to it. Several clucks of obvious delight… and I have to admit, I got a little teary-eyed too. She pulled it under her wing. Of note, this was one of the older one week old chicks. Well, I bought it from the store a week ago so maybe it was a little older. My thought was, I didn’t want to introduce a younger one, and then have to introduce older ones later. It seems to work right. A little later, I added another one, and managed to steal a faux egg out from under her too. Success again. I let them be for another hour or so. Then, decided I needed to get everyone out of the coop and into some private quarters before nightfall so the others could come back in to roost for the night. I set up a small area in my garage, and used a cardboard box on its side and stuffed it with shredded newspaper. I got a plastic tub with a lid and went out and grabbed the hen, chicks (and all faux eggs underneath). Sure, there was some fuss.. but better now than later I felt.

I put everyone into the box and they took right too it. Things were going too easy… I’m really having fun at this time. Once everyone was settled in and things were quiet again, I slipped another one into the box… I had things pretty dark… with the flaps hanging down in front. I was able to open the back flap, drop it in, and close it. She took it again… a little more commotion… and it took her a while to let it under her. I was able to look in from the front of the box and watch to make sure she didn’t peck or reject it. All good. From here, I decided I wouldn’t add any more until night. I woke up at 3am, and added two more (these were the youngest ones I bought the previous morning.) She took them right in with a few clucks and things were silent. I think Miss Broody-hen was in Shambala. I waited another hour and added in the last two… along with several cracked-used egg shells that I had prepared. After-all, 8 chicks out of no where with no egg shells could have been suspect and I thought… since I had them, why not? I’ve since read in a few places on the net… that it is best to do the introductions at night… with total silence. Simply pull a chick from the brooder very quietly, drop in with momma, and say nothing. Chickens can’t see well at night and during the quiet and darkness, this is the advised way. I have to agree and if I ever do it again, I’ll introduce all of them under the cover of darkness.

As of this morning, momma brought them out of the box to the food and water… and she’s keeping a protective eye on them all. That’s 8 of 8 chicks adopted by one broody hen. Stay tuned to see how everything turns out!

Share it:

  • Click to share on Facebook (Opens in new window)
  • Click to share on Twitter (Opens in new window)
  • Click to share on Pinterest (Opens in new window)
  • Click to share on Reddit (Opens in new window)
  • Click to email a link to a friend (Opens in new window)
  • More
  • Click to share on Tumblr (Opens in new window)
  • Click to share on LinkedIn (Opens in new window)
  • Click to share on Pocket (Opens in new window)
  • Click to print (Opens in new window)

Filed Under: homesteading, how-to Tagged With: homesteading, how-to

Evolving the maple syrup operation

February 4, 2016 by Jason 6 Comments

My first trials into maple sugaring started in 2014. So start there if you want to see the first version of the maple arch. Sugaring was something I always wanted to do since watching my dad do it as a boy. I made it happen last year by grabbing some spiles and buckets over the internet and got it going. I also scored an evaporator pan to boil the sap and built a cinder block arch to hold it.

Maple syrup arch v1, cinder block and evaporator pan.

It did great but eventually cracked from the heat and the changing of the season. Here I am, on year two starting over completely. The new arch was to be free-standing and portable. I also scraped out the area where it would sit. It was a lot of work, but I got by with a lot of help from friends, all of whom share in the rewards. It was a crazy year already and maple season falling at the end of January meant no time to rest.

I scored one of those 250-gallon fuel tasks off Craigslist. The ad said, free, just come take it. I soon found out it was still installed and had about 70 gallons of fuel in it. So the first friend I recruited was Jimmy, who rolled to KY with me to unhook, empty and bring home.

Next, I had to cut out the holes and build a fire in it to burn out all the fuel oil. It was fun making fires in it over multiple days during the cold winter days.

20160129_152007

Now the fun started… at least, it was fun at the beginning. I had made up plans of my own after looking over countless ideas and pictures on the internet. I chose the idea that best fit the evaporator pan that I had and made sure that there was maximum fire exposure to the bottom of the pan. My friend Darian was the one who did the welding and metal cutting. He helped me make quick work of things and helped realize the visualization I had on paper. Sparks flew and it really started to shape up. We created a back wall and a ramp that would direct the heat along the bottom side of the pan before going up the flu. It should be noted that another friend, Jeff, contributed some big materials. Particularly the much-needed angle iron that would go around the sides of the maple arch to hold the pan. This was some heavy stuff–surely costly if I had to buy it.

The tank cut open. We cut off the end and moved it over to the other side
The front of the tank moved to the back to form the chimney
Cutting additional pieces for the inside
Welding the pieces inside
Back wall of firebox
Darian makes good clean welds
More welding
Held in place ready to weld.
More cutting.
All sewed up
Welding
Welding the side bars. The evaporator pan sits on these.
Cross member in the center to keep pan from dropping in
Top of chimney
Finished and ready to paint
All painted and ready to burn
Fresh coat of paint

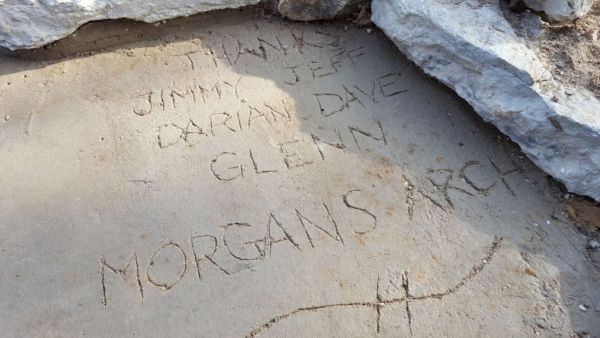
By now, I was ready to get this in place. But, I now needed to revise the area where the arch would site. For this, my late friend Glenn offered to help me out. Glenn and I spent an entire day working out the pad where the arch would sit. Just as a journal entry, Glenn died in an accident on May 28th, just 4 months after helping me with this. He dropped everything to come and help me and would do that a lot to help a friend. God bless him. That’s Glenn in one of the pictures below. We dug and poured footers and a pad for the arch to sit on. He recommended I set up a tent with some kerosene heaters around it to properly cure the cement over the night that was expected to be cold.

The pad I started before we decided to pour footers and a pad.
Getting the tent up and carving out the hole more.
ug the footers.
Laid gravel, and a drain pipe behind the wall before pouring cement.
All done and curing for the next couple days.

With the pad done, it was time to move the arch into place and line it with brink for the firebox. The pics below show how I initially laid it out. I used sand to pack in between the bricks.

20160222_203443

The arch looked good out of the gate. I sat a fire grate inside on the brick to raise it up for good air flow. I was already bringing in sap and it was right on time for our first boil. For this, my friend Dave comes over. Dave taps trees too. Dave and I put our sap together and boil it all down at once. Dave also has a sawmill and so he has lot’s of wood to bring and burn. The arch takes plenty of wood too, so Dave plays a pretty critical role here. We got it going and all was going good at first. The fire was hot, and the sap made it to a boil fast. The ash built up fast and the fire couldn’t get air. As a result, it wasn’t burning hot enough. We found ourselves shoveling out ash and disturbing the coals basically cooling the evaporator pan too often, too much. Breaking the boil really slowed things down. We were improvising now. We knew we needed modifications, but we needed to finish this boil first. We cut holes in a pipe and shoved it into the coals to pump air in. It was pretty much a forge now. It helped but created a lot of ash… and of course, it was getting in the syrup. The arch needed some modifications, and fast… as more sap was coming in.

Looking good, and 100 gallons of sap to start
All assembled and fire started.
She got to boiling pretty quickly.
After a while, the ash overwhelmed the firebox with no easy way to get it out.

It was time to call Darian back up. I was already sketching out ideas on increasing airflow while we were waiting for the first batch of sap to finish. Thankfully Darian jumped to the occasion and we made modifications damn near the next day. We cut out the bottom of the front, below the door, and welded two large pieces of angle iron along the length of the inside. This was to hold a beefy grate that we made out or rebar. Basically, we created a way for the ash to fall through and be easily shoveled out as needed. See the pics below. The minor modification ended up being pretty significant.

Angle iron along the inside that would hold both the grate, and the brick sides.
Looking in the front door.
Darian welding up the rebatr to make the grate
We used a lot of rebar knowing the fire would be hot and be subject to warping.
All fastened together
Grate in place, pre-brick.
Brick in place.
Looking int he front door.
The fire started right up and got going fast from good air flow.

The grate ended up lifting the fire higher up and closer to the bottom of the evaporator pan. This made it so we didn’t need as large of fire so it conserved wood even better now. We found the sweet spot. The ash dropped through the grate and we were able to pull it out the front as needed. The next boil of sap went right on through. The arch was finally doing what we had hoped for. I was running about 27 taps this year, and my friend Dave was running about 12. Here’s a few pics of the trees and taps… and in the backwoods, I used 6-gallon buckets with 1 or two taps going into them. They needed to be emptied once a day.

Old bucket and spile system
Newer plastic taps available on Amazon.
The evaporator pan with rendered sap in it.
Maple sand on the bottom of the evaporator pan.
Filtering the sap through a pre and post filter.
The finishing. We did this on a propane burner.
Sterilized containers.
The finished product.

So there we are, another hard, but a successful year of sugarin’. I feel we’ll be ready for 2017 to really put some syrup away. This really was a project that brought together friends for a common cause. I lost my friend Glenn, and that was and still is hard. But, I’m grateful for the time we had together… and his involvement in this project was special to me as was the involvement of many other friends. When I came yellin’ they came helpin’… and for that, I’ll make sure they all have maple syrup every time it comes out of this arch.

20160207_151710

Share it:

  • Click to share on Facebook (Opens in new window)
  • Click to share on Twitter (Opens in new window)
  • Click to share on Pinterest (Opens in new window)
  • Click to share on Reddit (Opens in new window)
  • Click to email a link to a friend (Opens in new window)
  • More
  • Click to share on Tumblr (Opens in new window)
  • Click to share on LinkedIn (Opens in new window)
  • Click to share on Pocket (Opens in new window)
  • Click to print (Opens in new window)

Filed Under: homesteading, how-to Tagged With: homesteading, how-to

Bee Hive Christmas Ornaments

December 24, 2015 by Jason 12 Comments

Beehive Christmas Ornaments are a seasonal favorite. They have been so popular, we find them going faster than we can produce them. We were out of stock for the 2021 Christmas season, and we offer our apologies for that. We’re working hard to produce them in time for the 2022 Christmas season. We hope to have them ready to order by Thanksgiving.

They have flat lids just like the original Langstroth style bee hive.

Christmas Ornaments 
$12 + shipping

Visit our online store here and grab some honey and candles while your’re at it.

As much as I’d like to claim the original idea, I cannot. I was at my beekeepers Christmas party around 2016 and a member came in with pieces that he said he made 5 years prior. They were just cut pieces of pine, un-assembled, and unpainted. They were single deep box Langstroth bee hive Christmas ornaments. Each had a bottom board, a deep box, and a garden-style lid. He allowed members to take them and assemble them at home. Of course, I took one and immediately thought of all the changes I wanted to make to it.

First, was some additional boxes… more deeps, or mediums? Definitely one more box. I experimented with a number of boxes, 3-deeps, a deep and two mediums, but finally settled on one deep and one medium. Then, I also experimented with the finish… did I want shiny and new, or worn and rugged? I entertained wood-burning and added the nails on the corners of the boxes. Then last, I burned in the date and a Christmas message on the bottom of each.

In this fast-paced world where everything is mass-produced and disposable, it’s nice to have something that can be seen and appreciated each year. Rarely lost, ornaments get packed away with the Christmas stuff, only to be pulled out and appreciated for a while the next year. The beehives strike a chord with beekeepers, but also are appropriate as gifts from a beekeeper.

I keep no secrets here… the process I used to replicate these was simple if you have a workshop and some basic tools. Here is the process I used, and I’m sure anyone could make improvements to make these their own.

I started with a simple 2×4 and ripped it down the center to have two equal halves. I cut my cubes off of that… and struck lines and filed them out to make it appear as two boxes stacked on top of each other. I also ripped the roof material from another 2×4 into the triangle shape. It helps to have a table saw whose table can be adjusted at an angle to cut these pieces. For the bottom board, just as you might suspect… another long strip about 1/4″ thick. Basically, all the pieces were cut into lengths. That’s the hard part. Then, you will make cross cuts to cut off each individual hive body, roof, and bottom board.

The bottom board was a little more involved… at least, my approach was. I used a stationary router with a flat bit and made up a make-shift jig to allowed me to stick the wood in, and route out the small notch for the front of the hive. Because these pieces are so small, I routed each piece individually while still connected to the length of wood… stuck it in the router to take out the notch… and then ripped the piece off individually. I went back to the router to make the next notch, then ripped that piece off again. I repeated the process here for each piece. One could maybe use a Dremel (that would render a cruder cut, but may add to the character of the ornament).

See the pics below. I’d be happy to answer any questions you may have… and, Merry Christmas!

2×4 ripped down the center, then blocks cut out
Experimenting on how I wanted to stylize the blocks.
Blocks cut. Almost didn’t want to paint. I did use a wood burner for a few.
A cylindrical dremel tool bit at an agle was used to make the handles.
Bodies painted.
Playing with paint. I did not like the grooves and handles painted.
A single body hive.
Blocks sanded and primed.
Playing with patina.
The roofs were painted a copper color.
The 3-deep tower hive.
Deep and two mediums. Woodburned.
A few different styles
The typical hive I replicated for family and friends.
Finished hives in various styles.
Signed and dated.

Share it:

  • Click to share on Facebook (Opens in new window)
  • Click to share on Twitter (Opens in new window)
  • Click to share on Pinterest (Opens in new window)
  • Click to share on Reddit (Opens in new window)
  • Click to email a link to a friend (Opens in new window)
  • More
  • Click to share on Tumblr (Opens in new window)
  • Click to share on LinkedIn (Opens in new window)
  • Click to share on Pocket (Opens in new window)
  • Click to print (Opens in new window)

Filed Under: beekeeping, do-it-yourself, how-to Tagged With: beekeeping, do-it-yourself, how-to

Traditional English Pork Pie

November 13, 2015 by Jason Leave a Comment

While going through the freezer the other night making space for hunting season, I collected a number of pig trotters that were begging to have something done with them. I decided on pork pie. The trotters would be cleaned and boiled to make an aspic for the jelly. I depended on a mash of recipes and processes from the Internet as well as some charcuterie books. The components of a pork pie consist of the outer pastry shell, the meat filling, and the aspic, or jelly that is poured in before chilling the pie.

Preparing the jelly by boiling the trotters with other seasonings.

Here’s what I ended up with.

For the jelly, I rendered my pig trotters to make the aspic the day before since it alone takes about 3 hours to cook.

  • 1 lb. of pig trotters. I had 4, and used them all
  • 4 large chopped carrots
  • 1 large chopped onion
  • 1 chopped stick of celery
  • 4-5 bay leaves
  • 1 tbsp. of chopped parsley
  • 1 tbsp. of thyme
  • ½ tbsp. of peppercorns

I also had some dehydrated seasoned tomatoes that I added in. It’s OK to improvise. I cleaned and scraped off any hair or debris from the trotters. I also blanched them and drained the water before using. Add the trotters and all the ingredients above to a clean pot and fill with water until everything is just covered. Bring it to a boil and then reduce to a simmer for three hours. You can skim any scum as needed. Once done, strain and put back on the stove to simmer until the liquid is reduced by 30-40%. When this is chilled, it will turn to a jelly that can be cut with a knife, but not too rubbery. I chilled this until the next day, and reheated before using.

Filling the pastry with the filling.

For the filling, I used just over a pound of 50/50 lean/fat pork that I had, but you can use shoulder, or other cuts you that you like.

  • 1.3 lb pork and fat
  • 1  chopped onion
  • 1 tsp. sage
  • 1 tsp. thyme
  • 1/2 tsp. allspice
  • I also added 2 cloves crushed garlic
  • Salt and pepper to taste

Mix all the ingredients with the pork and fat, and add to your pan that is lined with the pastry shell. You do not need to pack the filling tight as you will want the space for the jelly to run down through later. Once the filling is added, roll out your lid, place it on top, and flute around the edges. I also added some leaves (since it’s fall, and I was inspired). Poke a hole about the size of your pinky in the top middle… or make two on each side. This hole will be used to pour the aspic in later after it’s cooled.

I had some filling left over, and so I made up another batch of pastry and lined muffin tins to make smaller personal pies.

Adding the lid and leaves.

The hot water pastry, simple, neat and quick since I had lard already rendered and ready. Really, you can use whatever pastry recipe you like, but I used,

  • 4 oz. water
  • 4 oz. lard
  • 10 oz. flour
  • ½ tsp. salt
  • 1 egg beaten for the egg wash.

Boil the water and lard until the lard is melted. Add the salt and flour and mix until it forms into dough. The lard keeps the pan lubricated and you should be able to tip the dough out and knead it by hand before rolling it out. As the dough cools, it begins to harden. I found that I needed it to cool more so that it didn’t tear when I lifted it up to line the pan. Flour your surface, knead it and roll it out to about 1/8″ thick, and line a 3×6″ pan. Make sure you keep enough to make a lid for the pie.

Bake at 400°F for 30 minutes, then reduce the heat to 375°F and bake for another hour. You can remove it from the tin once it’s manageable, but this time, I let it stay in the pan.

Boil up the jelly and allow to cool a little. Using a funnel, pour the jelly into the pie through the hole(s) you made.  Keep adding more jelly and allow it to settle before adding more. When the pie cools again, the jelly will set. Pork pie is traditionally eaten cold, but if you want to warm it a little, go for it. Just don’t warm so much that your jelly re-liquefies or you’ll be robbed of the savory flavor that is… pork pie.

Cleaned pig trotters
Blanching the trotters
Preparing the jelly by boiling the trotters with other seasonings.
The jelly after couple hours.
Fresh lard.
Measuring the lard.
The final aspic that was rendered.
The trotters fell apart after they were boiled.
The 50/50 pork/fat that was minced for the filling.
Making the hot water pastry
The seasoned pork mince.
Filling the pastry with the filling.
Adding the lid and leaves.
Using the remainder to make smaller pies.
The baked pies, eggwashed before cooking, and ready for the jelly.
The final smaller pies.
The final loaf pie.

Share it:

  • Click to share on Facebook (Opens in new window)
  • Click to share on Twitter (Opens in new window)
  • Click to share on Pinterest (Opens in new window)
  • Click to share on Reddit (Opens in new window)
  • Click to email a link to a friend (Opens in new window)
  • More
  • Click to share on Tumblr (Opens in new window)
  • Click to share on LinkedIn (Opens in new window)
  • Click to share on Pocket (Opens in new window)
  • Click to print (Opens in new window)

Filed Under: charcuterie, food/culinary, how-to, recipe Tagged With: charcuterie, food/culinary, how-to, recipe

Set up Honeybee Observation Hive

June 20, 2015 by Jason Leave a Comment

I’ve been wanting to set up a very portable observation hive for a few years. To date, I have borrowed them from fellow beekeepers to do bee education presentations for various groups. Since I didn’t want to wear out my welcome with the generous people who have loaned them to me, I finally have one ready to add bees to.

After seeing, and using various styles of observation hives, I settled on the style I found best for what I am doing. This style stacks two deep frames and two medium frames inside a case which I think is the perfect cross-section of a typical Langstroth hive. There’s little place for the queen to hide once I take the covers off. Some fold-away feet turn on central pivots on the bottom to make a stand while it’s off the dock.

A simple piece of tin slides under the front door in some grooves to block the entrance coming in from the bottom-center before un-docking the hive. Both this piece of tin, and the doors are fastened with screws so no one can open it while it out in the public.

When the feet are turned out, they will be clamped to the table for extra stability. There are multiple vents on the top, and two sides to allow good air circulation. Two blinds, one for each side were made out of foam insulation, that I’ll plan to paint black, or add a layer of cardboard to ensure it’s dark inside while the sides are on and the hive is not in use.

Most importantly, I wanted to be able to park the observation hive at home, and let the bees reside in it all season. Being able to rob out an occasional frame of brood, or honey to bolster another hive while keeping the observation hive from swarming is an added benefit.

Of course, parking the hive outside, I also want to keep it out of the direct elements so it doesn’t wear out so fast. The solution for me was to build a dock off the front of my south-facing chicken coop. The overhang from the roof above comes out far enough to keep most of the rain off it, but yet it still gets plenty of sun to help thwart hive beetles.

For the dock, I wanted to emulate the typical landing board of a langstroth hive. This allows any bees that were out and about before I closed it off and took it to congregate until the hive returns. The idea would be, returning the hive to its position at the end of the day would allow the bees that have gathered, or bearded on the landing board to find their way into the hive.

The observation hive sits on top of the dock and a 1.5″ PVC pipe comes out of the dock and into the bottom center of the observation hive. You would sit the hive on the pvc pipe, then a pair of handles on the top of the hive engage with some latches at the top. This holds the hive in place on the dock (see pictures in gallery).

I took the liberty of making the entrance travel off to one side so that I could stand in front of the hive and latch/unlatch it when I’m docking it. Straight to the other side of the dock is an area that accommodates a feeder jar if needed. It’s screened off with #8 hardware cloth and can be left open without a jar. So, the bees come into the entrance on the left, travel through PVC that has been roughed up on the inside (for traction). They can choose to go up and into the hive, or straight to the feeder area. The feeder area is located well away from the entrance and the entrance hole has been left a reasonably small size. See the pictures in the gallery for more detail.

I think it will work very well and we’ll just see. I hope I give someone else some ideas or encouragement to finally build the observation hive they have been thinking of. See a video of the virgin queen tearing down a another capped queen cell with some other worker bees below the pictures.

What are some of your thoughts on the ideal observation hive?

Share it:

  • Click to share on Facebook (Opens in new window)
  • Click to share on Twitter (Opens in new window)
  • Click to share on Pinterest (Opens in new window)
  • Click to share on Reddit (Opens in new window)
  • Click to email a link to a friend (Opens in new window)
  • More
  • Click to share on Tumblr (Opens in new window)
  • Click to share on LinkedIn (Opens in new window)
  • Click to share on Pocket (Opens in new window)
  • Click to print (Opens in new window)

Filed Under: beekeeping, do-it-yourself, homesteading, how-to Tagged With: beekeeping, do-it-yourself, homesteading, how-to

  • « Previous Page
  • 1
  • 2
  • 3
  • 4
  • 5
  • 6
  • …
  • 14
  • Next Page »

Search the site

Recent Posts

  • Seasoned cauliflower & quinoa burgers May 7, 2021
  • Preserved Black Walnuts January 17, 2020
  • Nocino Walnut Liqueur July 25, 2019
  • Requeening honeybee colonies with cells July 9, 2019
  • Mushroom Jerky May 27, 2019

Archives

Categories

  • beekeeping (40)
  • charcuterie (13)
  • cheesemaking (7)
  • do-it-yourself (15)
  • family (20)
  • food/culinary (47)
  • friends (21)
  • gardening (3)
  • genealogy (15)
  • grape growing (10)
  • health (3)
  • homesteading (38)
  • how-to (67)
  • music (3)
  • outdoors (30)
  • rants (6)
  • recipe (21)
  • Uncategorized (40)
  • videos (22)
  • winemaking (21)

About AllMorgan

AllMorgan started as a family blog to keep extended family and friends around the world apprised on what's going on at the Morgan Ranch. Over the years, it grew in to something so much more.

Learn More

Welcome to AllMorgan

AllMorgan started as a family blog to keep extended family and friends around the world apprised on what's going on at our Indiana homestead. It always been a cross between a family diary and photo … Read more

Did you know?

The queen bee doesn’t decide what happens in a colony. The workers do. They adjust her feeding to make her do what the majority says. The queen can’t feed herself.

Copyright © 2025 · Outreach Pro on Genesis Framework · WordPress · Log in