AllMorgan

Visit us on

  • Email
  • Facebook
  • Instagram
  • LinkedIn
  • Pinterest
  • RSS
  • YouTube
  • Home
  • About
  • Beekeeping
  • Homesteading
  • Winemaking
  • Genealogy
    • The Morgan Family Today
    • Getting Started in Genealogy
    • Favorite Genealogy Links
  • Store
You are here: Home / Archives for beekeeping

Set up Honeybee Observation Hive

June 20, 2015 by Jason Leave a Comment

I’ve been wanting to set up a very portable observation hive for a few years. To date, I have borrowed them from fellow beekeepers to do bee education presentations for various groups. Since I didn’t want to wear out my welcome with the generous people who have loaned them to me, I finally have one ready to add bees to.

After seeing, and using various styles of observation hives, I settled on the style I found best for what I am doing. This style stacks two deep frames and two medium frames inside a case which I think is the perfect cross-section of a typical Langstroth hive. There’s little place for the queen to hide once I take the covers off. Some fold-away feet turn on central pivots on the bottom to make a stand while it’s off the dock.

A simple piece of tin slides under the front door in some grooves to block the entrance coming in from the bottom-center before un-docking the hive. Both this piece of tin, and the doors are fastened with screws so no one can open it while it out in the public.

When the feet are turned out, they will be clamped to the table for extra stability. There are multiple vents on the top, and two sides to allow good air circulation. Two blinds, one for each side were made out of foam insulation, that I’ll plan to paint black, or add a layer of cardboard to ensure it’s dark inside while the sides are on and the hive is not in use.

Most importantly, I wanted to be able to park the observation hive at home, and let the bees reside in it all season. Being able to rob out an occasional frame of brood, or honey to bolster another hive while keeping the observation hive from swarming is an added benefit.

Of course, parking the hive outside, I also want to keep it out of the direct elements so it doesn’t wear out so fast. The solution for me was to build a dock off the front of my south-facing chicken coop. The overhang from the roof above comes out far enough to keep most of the rain off it, but yet it still gets plenty of sun to help thwart hive beetles.

For the dock, I wanted to emulate the typical landing board of a langstroth hive. This allows any bees that were out and about before I closed it off and took it to congregate until the hive returns. The idea would be, returning the hive to its position at the end of the day would allow the bees that have gathered, or bearded on the landing board to find their way into the hive.

The observation hive sits on top of the dock and a 1.5″ PVC pipe comes out of the dock and into the bottom center of the observation hive. You would sit the hive on the pvc pipe, then a pair of handles on the top of the hive engage with some latches at the top. This holds the hive in place on the dock (see pictures in gallery).

I took the liberty of making the entrance travel off to one side so that I could stand in front of the hive and latch/unlatch it when I’m docking it. Straight to the other side of the dock is an area that accommodates a feeder jar if needed. It’s screened off with #8 hardware cloth and can be left open without a jar. So, the bees come into the entrance on the left, travel through PVC that has been roughed up on the inside (for traction). They can choose to go up and into the hive, or straight to the feeder area. The feeder area is located well away from the entrance and the entrance hole has been left a reasonably small size. See the pictures in the gallery for more detail.

I think it will work very well and we’ll just see. I hope I give someone else some ideas or encouragement to finally build the observation hive they have been thinking of. See a video of the virgin queen tearing down a another capped queen cell with some other worker bees below the pictures.

What are some of your thoughts on the ideal observation hive?

Share it:

  • Click to share on Facebook (Opens in new window)
  • Click to share on Twitter (Opens in new window)
  • Click to share on Pinterest (Opens in new window)
  • Click to share on Reddit (Opens in new window)
  • Click to email a link to a friend (Opens in new window)
  • More
  • Click to share on Tumblr (Opens in new window)
  • Click to share on LinkedIn (Opens in new window)
  • Click to share on Pocket (Opens in new window)
  • Click to print (Opens in new window)

Filed Under: beekeeping, do-it-yourself, homesteading, how-to Tagged With: beekeeping, do-it-yourself, homesteading, how-to

Planting forage for bees and pollinators

February 22, 2015 by Jason Leave a Comment

During the January 2014 Moores Hill SIBA meeting last year, Roy Ballard from Purdue, and Tim Schwipps from the USDA-NRCS came and spoke about planting forage for bees and other pollinators. They made clear that there can be help available at both the state and local levels. I decided to pursue things since I had 1.5 acres that I wanted to do something with and I felt if it meant having some more honey in the hives, as well as some pretty flowers to look out at on my back hill, let’s try it out.

After exhausting all options, I found that having only 1.5 acres did not entitle me to any assistance. This is always changing, so don’t let this discourage you. I know there were a few others in our club that did get assistance since they had more land to work with. To be clear, the state DOES want you to reserve land for wildlife and in many cases, they will help finance some of your materials and effort. You just have to look around and contact the right people who know. I continued to pursue my goals and bank-roll myself since it was only 1.5 acres. Here is my story, and the steps I took. Keep in mind, I will be describing my specific plans in hopes that it can be helpful to someone else. Just be sure to make your own plan before executing.

I’m in Dearborn county and the result of my searches connected me with Chris Grauel who was extremely helpful, and my guide during this entire process.

Chris Grauel, Wildlife Biologist
IDNR/Division of Fish & Wildlife
2010 S. State Hwy. 3
North Vernon, IN 47265-7950
(812) 352-8486

Chris treated me just as if I was someone who was seeding 100 acres of land. He came out and took a look, offered advice and followed up with a detailed step-by-step plan… including a burn plan for my specific area. He also pulled applications for me and made me aware that I needed to contact the right people (local fire, neighbors, etc. at the right time before burning. If you do something like this, definitely have a single point of contact like Chris.

Susan Knowles also accompanied Chris on the visit to my property and she too made many suggestions, and directed me to potential resources… including where to look for wildflower and other seed mixes. Susan suggested depending on mu timing, she may be able to add my seed order on with someone else who was getting a larger order. It didn’t pan out for me… but that is a real option for people like us not sowing 10+ acres.

Susan M. Knowles, Wildlife Biologist Private Lands
Muscatatuck National Wildlife Refuge
12985 E US Highway 50
Seymour, IN 47274
812-522-4352

We started by burning a brush pile, but used torches to do a controlled burn across the hill.

Another key player for me was Vickie Smith at Dearborn County SWCD. When I was getting quotes for 8k worth of fertilizer, she directed me to Laughery Valley Co-op. suggesting I could get it there more reasonable. For my situation, bulk fertilizer, from Laughery Valley Co-op ran me $850 – 975.00 per ton (2,000 lbs.). They mix what you need into a buggy that you can pull home behind your truck, and then you do need a tractor with a PTO to spread it. I didn’t have the tractor and elected to have them drop it off to me, and spread it with the help of my brother-in-law who had a smaller tractor and a 500lb. spreader (see pictures). She also reminded me that lime should be applied in the fall before you seed. It will take the lime six months to make a difference, unless you purchase pelleted lime that works more quickly.

Vickie A. Smith, Environmental Technician/Educator
Dearborn County SWCD
10729 Randall Ave., Ste. 2
Aurora, IN 47001
812-926-2406 ext. 3
www.dearbornswcd.org

We tilled a burn perimeter in preparation for the burn.

Vickie also sent me the following:

“If you are interested in planting specifically for honey bees, then be sure to get online and check the seed that you are ordering will be what you’re wanting for honey bees… pollen and nectar source… and most importantly, the seeds have not been treated. I’ve attached a good article on honey bees (the article happened to be written by Kathleen Prough, our State Apiarist.)

With the key people identified, let’s start with my specific plan outlined by Chris Grauel. Believe it or not, the following is edited for brevity.

–Specific plan for converting approx. 1.5 acres to bee pasture–

The open area is approximately 1.4-acres; of which, about 1.0-acre of the area is slightly sloping (<12% slope) and the remaining 0.4-acre is severely sloping (>25% slope). The vegetative cover is composed primarily of tall fescue and smooth brome grasses; and, danced throughout the field are sapling trees. Herein lies the first step to your process of developing this open area; I would suggest mowing the open area once around May 1st, 2014 to suppress these saplings (i.e., to stunt their height) in order to make later herbicide applications less difficult.

The next order of business is to have a soil test performed. Most any farm co-op and seed store can provide this service for a nominal fee (it was free for me, being in Dearborn county at the SWDC); and, some soil and water districts offer soil tests to landowners or can suggest a laboratory to perform the soil analysis. The results of the soil test should include recommendations for any necessary amendments. I would predict the results will include adding lime in order to increase the soil pH; if so, make the application a few months in advance of planting your seed so it has time to incorporate with the soil.

Dropping lime

Next, you must perform a controlled burn (see my specific burn plan) and utilize a frost-seeding method of planting. The steps would be these:

a. Mow the planting area to a height of about 4-6 inches around the first week of September. Then allow about three weeks, or until the mowed grass has put forth about 6 inches of new growth, and spray the planting area with a glyphosate herbicide. Generally the per acre rate is 1½ quart glyphosate herbicide, 3 lbs. of ammonium sulfate and water. Read and follow all directions, rates and warnings as specified on the manufacturer’s label.

b. Next you will need to establish control lines (firebreaks) around the planting area. These can be accomplished by either discing or roto-tilling a 6-foot wide bare soil strip around the perimeter. These strips can be put in place about one-week+ after the spraying was performed.

c. Anytime between after the firebreaks have been put in place and up until February, a controlled burn must be conducted to remove the dead vegetative debris. You will need to contact me a month in advance for a burn plan. This removal should ensure good seed-to-soil contact when the seed is broadcast. Chris Grauel also lent me all the equipment I needed to conduct the burn, including flappers, drip torches, and water pack. He even dropped it off to me in November, and said he’d pick it back up in March. Wow… what a guy!

d. Following the burn, and between Jan. 1st and February 15th, the seed should be broadcast over the area. Frost-heave (freezing and thawing of soil) will work this seed into the soil for later germination in the springtime.

e. It is likely that, although you have killed the grass in the fall, come springtime new grass plants will appear from seed stored in the soilbank. If this does occur, or occurs over following years, a simple application of a grass-selective herbicide will clean these grasses from within your pollinator planting.

Fertilizer delivery

As for species selections and seeding rates, the sky is about the limit (and the size of your wallet). I have attached a USDA list of preferred pollinator plants that should offer good guidance with your choices. As I say, many wildflowers are a bit pricey. You may want to consider planting with a majority of clover species and perhaps including a small amount of wildflowers seeds. There are many clovers that would perform well at your site: crimson, red, white ladino, alsike, white Dutch (what grows in our lawns) and sweet clovers. Clovers will bloom throughout most of the growing season; whereas, most wildflowers have a fairly specific bloom period.

When/if you include wildflowers, choose varieties that will bloom at various times of the season. The seeding rates will hinge on the number of different species you select and what species you choose. Generally when broadcast seeding clover the rate should be in the ballpark of 10 lbs. of seed per acre; and, to that you might include about a pound of wildflowers seed per acre – total of 11 lbs. of seed per acre. And be certain the clover seed you use is either pre-inoculated seed or that you apply the proper inoculants to your seed.

If you want the area planted entirely to wildflowers, a general seeding rate is about 5-8 lbs. of seed per acre; 10 lbs. of a good wildflower mixture can cost around $300 to $400 per acre. Planting with several varieties of clovers is going to run you about $50 to $60 per acre.

20150215_130856
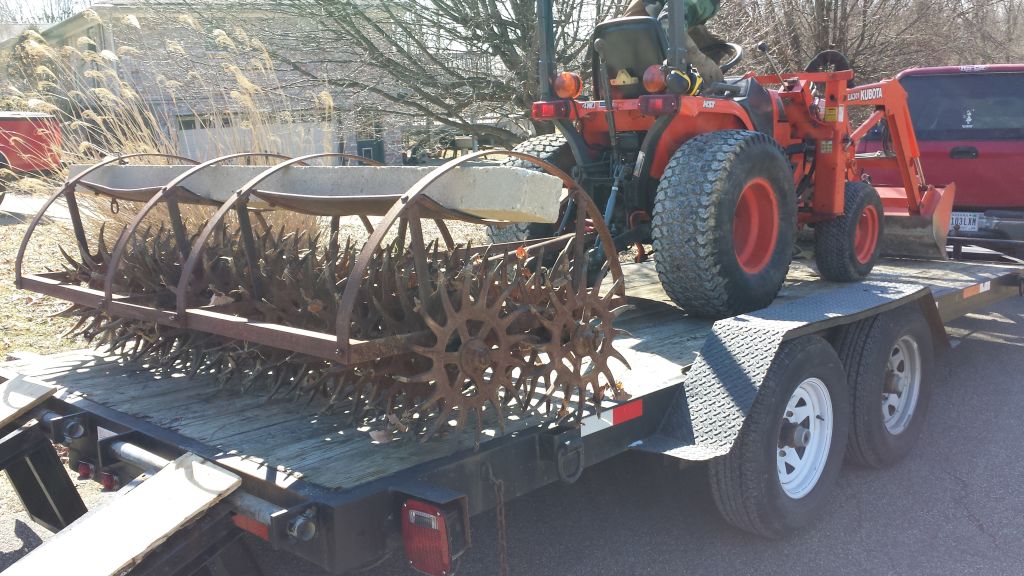
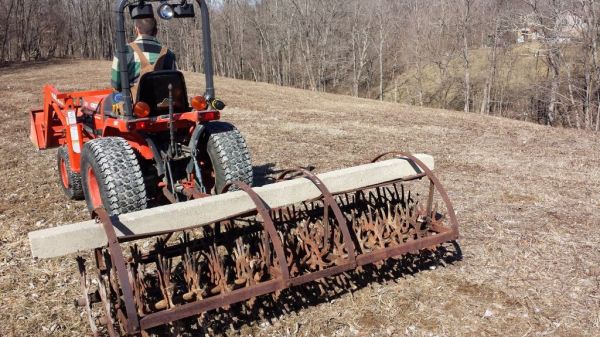
We used a rotary hoe to further fluff up the compaction from bush hogging. Then I lowered the deck of my walk behind to thrash it up.

I settled for a wildflower mixture from Jeff Dittemore at Bee-Friendly Beekeeping (info below). I paid $35 per pound of seed.

10 lbs. Bee Seed (Wildflower) mix $340

Because my hill was pretty steep, I couldn’t disc it without causing a serious erosion problem. This was already evidenced by the 4 foot trough we tilled around the field for our burn barrier eroding already. My method of seeding is frost-seeding. This method probably does cause a little more stress on the seed, but it was my only option. To get maximum soil exposure, I further worked the hill using a rotary hoe lent to me by a friend. It did a good job of breaking up thick tufts of dead grass and material I needed out of the way. After fluffing it up with the hoe, I lowered the deck of my 48″ walk-behind mower. This really thrashed everything up and threw it out of the way. I was very satisfied (see pics below) I mixed the seed with play sand at a ratio of 5lbs. of sand to 1lb. of seed to distribute properly. It was broadcast seeded at a seeding rate of 5-6lbs. of seed per acre the day just before a heavy snow! I am happy about that because it helped hold the seed in place vs. a heavy rain that could have washed it down the hill. We’ll see this spring how things work out.

Here is the information I’ve collected on seed sourcing.

Jeff Dittemore
765-891-1783
Visit Bee Friendly Beekeeping on Facebook

20150215_131515
Mixing wildflower seed with sand.

BFBK Seed Mix. ($35/lb. and 5-6lbs/acre)

Purple coneflower 10%
Dwarf sunflower 10%
Lanceleaf coreopsis 8%
Blanket flower 8%
Blue flax 7%
Perennial lupine 6%
Clasping coneflower 5%
Cilantro 5 %
Prairie coneflower 4%
Mexican hat 4%
Basil 4%
Partridge pea 3%
Prairie aster 3%
Annual lupine 3%
Dwarf annual lupine 3%
Crimson clover 2.5%
Lacy phacelia 2%
California poppy 2%
Lemon mint 2%
Cosmos 2%
Plains coreopsis 2%
Black eyed susan 2%
California bluebells 1%
Showy primrose .5%
Bergamont/bee balm .5%
New England aster .5%

—

20150215_140833
Soil exposure after burning. Not really good since we never had the perfect dry day.

All said here is what it took me to prepare and seed 1.5 acres with a wildflower mixture.

About 10-12 hours (not consecutive) of my time digging soil and sending samples to the lab, calling and emailing people to source reasonable tools to work the land, and running back and forth.

$50 paid to someone to come and bushhog my hill.

4-5 hours with myself and brother-in-law spreading lime and fertilizer.

3,659 lbs. of Fertilizer
4,878 lb/s of Lime
2.1 qts. of Glyphosate
4 lbs. Ammonium Sulfate
10 lbs. Bee Seed (Wildflower) mix  = $340
—-
$1190

4-5 hours and 4 great friends who came and helped me conduct the controlled burn on New Years Day this year.
11 hours of working with my brother-in-law who generously brought over his tractor to spread lime, fertilizer, and prep before seeding.

Here are other places I considered for seed. Just adding it here for your convenience.

20150215_171150
The final soil exposure before seeding.

Laughery Vallery Co-Op
Wayne Jenner sent me the following on their seed mix. ($33.75 lb. and 4-9 lbs/acre
11016 U.S. 50
Dillsboro, IN
(812) 432-5267

—

Applegate Seed House, “Tom” has a mix for pollinators and I did not get the data.
76 E 700 S
Brook, IN 47922
219-275-3664 or 219-863-2136

—

After frost-seeding, I will need to keep an eye on the back hill for growth. It’s no doubt that I will have the weeds I am trying to eradicate begin to emerge. In my plans, there is a suggestion to go through with a selective herbicide when needed. I do not know what this will be, nor the time as of yet. I also know there are many finger-sized stubs of black locust saplings that want to come up across the hill. I suspect I will be manually removing these as I can. Dealing with the past weeds that were on the hill will be interested and I am planning to allot some effort to try and keep it at bay until the new forage takes hold.

May 20, 2015 update on the pollinator pasture (with pics)

Share it:

  • Click to share on Facebook (Opens in new window)
  • Click to share on Twitter (Opens in new window)
  • Click to share on Pinterest (Opens in new window)
  • Click to share on Reddit (Opens in new window)
  • Click to email a link to a friend (Opens in new window)
  • More
  • Click to share on Tumblr (Opens in new window)
  • Click to share on LinkedIn (Opens in new window)
  • Click to share on Pocket (Opens in new window)
  • Click to print (Opens in new window)

Filed Under: beekeeping, do-it-yourself, gardening, how-to, outdoors Tagged With: beekeeping, do-it-yourself, gardening, how-to, outdoors

Bee colony cutout from a historical home

June 3, 2014 by Jason Leave a Comment

On Sunday, myself and two others executed a honey bee colony cut-out that has been in the planning for a couple of weeks. The colony was in a historical home on Cincinnati’s west side. The home owners said the bees have been in there for as long as they can remember and the mailman told them he’s watched bees come in and out since the 70’s. Sure, the colony has probably ebbed and flowed and maybe even went vacant for a stint… but where there is easy access to a dry space that smells of bees, and has plenty of comb in the walls, more bees are sure to eventually move in. 

Behind plaster and lathe, and in 12 foot uninsulated wall cavities, we eventually found a colossal colony that took 5 hours to remove. The home owners lived with the bees… that found their way in to the house but flew towards the light of the nearest window… which was the beautiful stained-glass window you see in the pics. The bees stayed near the window until they eventually died and cleaning up dead bees under the window became a daily task for them. They were apparently willing to live with the bees for quite a bit of time (which was really cool of them) but after the birth of their child, they decided it was a problem that needed to be dealt with. They spoke to many beekeepers before us and no one was interested in getting them out since it was going to be nothing short of a messy job.

We decided to go over and take a look. Using a stethoscope on the walls inside, we were able to identify  a wall in a closet on the other side of the wall that we could enter to access the bees. What we didn’t know that we were about to uncover an entire wall of bees. We ran through the options with the home owners, explaining that a trap-out was possible, but it was a lengthy process, and in the end, all the comb and honey is left in the wall. All holes would need to be sealed so that future bees wouldn’t find their way in. In retrospect, we now know there would be over 100 pounds of honey left sitting in the wall… something everything from ants and roaches, to mice would find.

After identifying where we would enter, we got to work. We tapped a hold through the lath, and were happy to confirm we hit the right spot as a few bees emerged. We blew a little smoke into the holes we found outside to calm them as we cut a square access hole inside. We use a bee vac that can safely vacuum bees into a special box that collects them. We cut a little more, and vac’d a little more. The combs just wouldn’t stop. We cut down to the floor the width of three studs, then we went upwards. The ceilings were about 12 feet high… and we ended up cutting all the way up. We gently vac’d bees, and cut out the brood frames first. These are the frames that hold eggs, and young larva that will grow in to adult bees. The brood frames are puzzle-pieced in to frames and rubber bands are used to hold the combs in. We’re in effect, rebuilding the bee combs in a standard bee box so that we can remove and inspect the frames later as the colony is managed. Of all the comb in the wall, we were able to build about 4-5 brood frames (many with pollen and nectar stores as well)… but all the rest was capped honey comb that broke our heart to have to tear out. We asked the home owner if they wanted to new comb to eat and use. They did, so we laid the best stuff on a plate for them to take to the kitchen. The rest was oozing out from removing the plaster lathe from it. Rather then waste all the honey, we put those combs in plastic garbage bags to take back to the apiary and lay them out on sheets for the bees to come rob out. 

In the end, we took home a very nice colony of bees, all the honey comb that became free bee food, and we left some very happy home owners who were thankful the bees have finally been properly removed, safely, effectively, and free of charge. They went out-of-the-way to thank us and tell us we did them a huge favor. For us, it’s just another fun day playing with the bees. We’re happy to help someone out especially if we can help save the bees.  We also gave the colony to a new beekeeper in our group who needed them. It’s nice to help a new beekeeper get a hive set up with little to no cost as well.

Enjoy some pictures and videos below… and if you need help with bees in the Midwest, drop me a line.

Taking off the plaster and lathe.
Gently vaccing bees from wall.
Lots of bees, brood, and honey comb.
Bees inside the house as we worked on the open wall.
Prepping the area.
Planning the approach.
Using stethoscope to verify the bees in the wall.
Carefully working around in someone’s very nice house.
Prepping the area.
Cutting in to the plaster and lathe.
Just broke through. Happy to see we correctly located them.
Vaccing bees from the combs to make it easier to cut out.


Share it:

  • Click to share on Facebook (Opens in new window)
  • Click to share on Twitter (Opens in new window)
  • Click to share on Pinterest (Opens in new window)
  • Click to share on Reddit (Opens in new window)
  • Click to email a link to a friend (Opens in new window)
  • More
  • Click to share on Tumblr (Opens in new window)
  • Click to share on LinkedIn (Opens in new window)
  • Click to share on Pocket (Opens in new window)
  • Click to print (Opens in new window)

Filed Under: beekeeping Tagged With: beekeeping

IBA Bee School XII 2014 in Indianapolis, Indiana

February 23, 2014 by Jason 2 Comments

I attended the Indiana Bee School XII in Indianapolis, Indiana on Saturday, February 22, 2014 with many of my fellow beekeepers. As usual, it was a great time… a full day of bee discussions and soaking up thousands of viewpoints. The attendance was a record. About 900 beekeepers were in attendance along with all our familiar vendors (Brushy Mountain, Kelley’s, Mann Lake, Blue Sky… and several others.) I had the pleasure of bartering some graphical services with an Amish vendor (King Bee) whom I met to pick up a bunch of woodenware. King Bee is located in Greencastle, IN and operated by a group of young Amish fellows. I enjoy talking to the Amish. It’s one of the things that keep me going back to the farmers markets each year. Their drive, work ethic, and professional appearance is both inspiring, and motivating. It is exciting to see how beekeeping is becoming more and more divers each year. It explains the record attendance at the conference, a 30% increase from last year.

There were over 900 people in attendance at the IBA beeschool, a 30% increased from last year.
There were over 900 people in attendance at the IBA bee school, a 30% increased from last year.

As always, topics ranged from basic to advanced… and of course, in between all the factual stuff, you get a lot of varying perspectives on beekeeping. Taking notes, or recording the presentations for later review is important. It’s too much to dissect and absorb on the same day. Topics ranged from sustainable beekeeping, queen rearing/grafting, spring management, bee nutrition… and more.

I personally was there to soak up all I could on bee nutrition. Just like us humans, bees need a quality, and diverse diet if they are to be their healthiest, fittest self. How can we expect the bees to battle all the adversity in their world with sub-par health? Not only is the summer and fall in our area often difficult for our bees due to droughts and derths (derths are considered periods where the bees forage minimal pollen and nectar,) but land that is otherwise used by the bees is being diminished to make way for humans in a variety of ways. Add this to the pesticide and chemical movements, it’s cleat, to the bee, that the world is becoming a less-friendly place.

Nutrition, in my estimation is becoming more and more challenging not just in my area… but everywhere.. I have considered closing up some of my bee apiaries and finding new ones. I have some state conservationists coming out to look over some of my land to talk about the possibility of turning it into bee pasture. That’s all I’m going to say on this matter and I hope it inspires you to think about ways to turn areas… any area, into bee-friendly, or even wildlife-friendly space.

Joe Latshaw talked about honeybee nutrition.

If we can address the nutritional needs of the honey bee, profound things can happen. Bees can fight off disease and virii more effectively. They can begin to challenge the varroa mite from taking over a colony, and they can find their fittest self to go out and forage, helping create a fuller honey supply. It pains me to think that when we fix one factor, it’s reduced by another. It is already a huge undertaking for the honey bee to fly out in search for a quality food supply. For that supply to be poisoned is heart-breaking. Corn and soy produce mediocre-quality nectar and pollen. The bees know the quality of their forage. If there is better forage nearby, they will go to it. However, if nothing else is found within the proximity of that colony, they will settle for the less-desireable supply. Only humans can help change this.

Many discussions included feed supplements to add to the hives. There were varying opinions on this, but everyone agreed that bee nutrition was a top priority. We have to be aware of the forage that is around our hives… and what kind of forage is available throughout the season. There are thousands of plant species that a bee can get pollen and nectar from, but in many areas, mine included, there are not enough species providing a quality, diverse, and most importantly a  continuous supply. over the next year or two, I hope to help improve this within the proximity of my own bee hives. Imagine what could happen if each of us did a little to help that. Ask yourself what is within reason for you to do? If you do not know, ask someone. There are people at your state and local level that are happy to help… and they may even grant you some money to do so.

Dr. Joe Latshaw.
Dr. Joe Latshaw.

Another touchy topic is dealing with varroa mites. Most believe that a properly nourished bee is better suited to begin to deal with them, but differences of opinion surface when it comes to how to deal with mites in the meantime. How can bees find their fittest self when they are oppressed by the disease-spreading parasite called the varroa mite? There are two schools of thought when it comes to managing mites; Chemical treatments, or natural treatments? Up until now, I’ve never used a chemical treatment, but I’ve also lost my best hives after three years, despite the best effort I have put into them trying various “natural treatments” documented all over this website. We have covered powder-sugar dusting, reducing mite loads using timed rood-breaks, and the home-testing that  typical beekeeper can do to measure and understand the mite loads in their hives. Just use the search mechanism at the top of the site to find them.

I enjoy being able to tell my customers that my honey comes from hives that have never contained chemicals. However, after understanding that the very foundation that I buy from the bee supply has trace amounts of chemicals in it as a result of them recycling the wax sold to them from larger beekeepers who do use chemicals, I am considering removing the chemical-free part, and explaining to the customers when asked. These trace amounts are just that… small, but Michael Bush will argue that it is enough to offset the natural balance of a bee colony. His solution is to allow the bees to draw all of their own comb and not use the contaminated foundation. I will be starting a couple “natural-cell” hives over the 2014 season to better see and understand this for myself. Michael Bush also has many years of practice and knowledge that has helped him arrive to where he is today. He also suggests that he has some great bee forage available to them… which I am sure makes a world of difference. Then, there are local guys like Tim Ives whose success runs contrary to the experience of many who do not use chemical treatments in their hives. Tim remains an inspiration to us as we push towards keeping bees naturally and removing the crutches that are often used to prop up the stability of our hives.

Jerry Hayes talked about sustainable beekeeping.

Along with my current “natural-treatment” apiaries, I am talking to some fellow beekeepers about setting up another testing apiary. We’re talking about calling it the “petri dish” where we will experiment with one of the many chemical treatments per year. The goal is to document some more solid facts and knowledge to bring to our bee meetings about its use… and results. Randy Oliver wrote a 12-part series on sick bees that make some compelling observations. All beekeepers who believe in good animal husbandry should read it. As I watch some of the new beekeepers that have set up hives last season going through their dead outs, I sympathize… and can relate because I have seen the same fate. We will be doing alcohol washes to test for mites in these deadouts so that we have definitive information about what happened to these hives. In our yards, mites are usually the prime culprit, and we’re determined to confirm it.

With each new beekeeper I speak to, there comes another nugget of information that needs to be considered and addressed. Dwight Wells tells us that it takes 4-5 years of beekeeping before one can really begin to understand enough about bees before they can make informed decisions about how they’ll change their practices in keeping bees. Should new beekeepers consider starting beekeeping using chemicals treatments to battle mites until they can become more informed about mites and their integrated propagation during the honeybee life-cycle and until they

Kelley's Beekeeping Supply from Clarkson, KY was one of the vendors in attendance.
Kelley’s Beekeeping Supply from Clarkson, KY was one of the vendors in attendance.

understand more about bee physiology and genetics that seek to create a more durable bee? Afterall, these beekeepers can’t be beekeepers with dead bees each spring. Dead hives also offer no motivation to pick up the pieces and try again the next season. Do we not want more people eagerly taking up beekeeping and keeping at it?

What suggestions would you offer a friend who is considering beekeeping to prevent some of the pitfalls you have seen? Attending a local bee meeting, or even better, a program such as the IBA bee school is a good start in getting the information you need to begin beekeeping, or become an even better beekeeper. Each experience you have in the apiary should be meaningful, and memorable. In the end, it all adds up to knowledge. Knowledge is what is needed to provide a happier world for the bees and we need more people contributing in every way they can. Talk to us by leaving your comments! What are your thoughts? What works for you? Lend your comments below.

Share it:

  • Click to share on Facebook (Opens in new window)
  • Click to share on Twitter (Opens in new window)
  • Click to share on Pinterest (Opens in new window)
  • Click to share on Reddit (Opens in new window)
  • Click to email a link to a friend (Opens in new window)
  • More
  • Click to share on Tumblr (Opens in new window)
  • Click to share on LinkedIn (Opens in new window)
  • Click to share on Pocket (Opens in new window)
  • Click to print (Opens in new window)

Filed Under: beekeeping Tagged With: beekeeping

Alcohol wash testing for varroa in beehive

February 3, 2014 by Jason 2 Comments

I took advantage of the warm day on Saturday after a week of freezing temperatures to check on the beehives. It was a bitter-sweet day, because I have some hives that are really strong and looking good, but I lost two. It’s a sad sight for a beekeeper when one hive is bustling and the other has nothing happening.

I brought the two hives home and went through them. I broke them down and noted all the obvious things. How much honey, if any, was in it… was there any moisture on the lid? I then took two samples of bees from each hive and put them into a cup with 72% rubbing alcohol. I kept one sample for myself to do my own alcohol wash, and the other sample will be sent off to Beltsville Bee Lab Monday morning. (* Update, bee lab results are back, see them at the bottom of this post) I like to make sure my methods of measurement still come up with numbers that are similar to what I get back from a lab. Since I also can’t test for things like nosema, it just makes sense to me to send some out.

Bees frozen in time. Note queen in the center.

I ran my own tests tonight and, as I suspected, I’m going with varroa mites again. 7 mites per 100 on one hive and 4 per 100 on the other. It’s funny how you can have two hives right next to each other…  seemingly identical in strength, using the same equipment and on the same forage, but each wildly different. The hive next to it is still very strong… in fact, opening the top of the hive, the numbers already show the queen has been laying, and new bees have emerged.

Broken down to its simplest form, we want to get the number of mites per 100 bees. I up my samples to take a ‘larger cross-section’ to 300 bees (about a half-cup of bees.) In this case, you would divide the result by 3 to get the number of mites per 100 bees.

If you are taking a sample of bees from your hive mid-season, you want nurse bees (shaken off a frame from the center of the brood) into a jar for testing. Make sure your queen is not in the sample. When mites emerge from a cell, they will either crawl into another cell to start the process over, or they will crawl on to the nearest bee and find a tender spot on them to suck on the bee’s hemolymph. Since the nurse bees are the ones that are taking care of the brood and usually always near the center of the brood nest, these are the bees that would most likely have the most mites on them. The final number is then doubled (to account for the mites that are still in the brood, and not on just the sample we took)

If you are processing a deadout (as I am in the pictures below) we are taking dead bees from wherever they are, but usually, there will be a big dead cluster of bees on the frames (frozen in time, see pics below). These bees are the better ones to sample than those laying on the bottom board. Of course, if you are doing a wash from a deadout (a hive that likely had no brood) then there would be no need to double the final number. So here is it, for those of you that Googled looking for the formula to process your data from an alcohol wash on your beehive:

Counting varroa mites from bee sample.

If we took a 300 bee sample (about a half-cup) from a live colony during the season:

Number of mites ÷ 3 = Mites per 100 bees x 2 (to account for mites still in the brood) = Total mites per 100 bees in the hive

If we took a 300 bee sample (about a half-cup) from a deadout during the winter:

Number of mites ÷ 3 = Total mites per 100 bees in the hive (no need to double the result since there is no brood in a winter deadout. You will check your frames for brood, of course.)

Also, do not confuse adult bees that died head first in a cell with brood. Take into consideration what a high mite count is for you. That number is going to differ from one beekeeper to another based on the general strength of the hive, genetics of your stock and maybe even location. One of my mentors has bees that can tolerate a much higher mite load than I can. I am taking note of this kind of data so that I can understand over time what a high mite count is for my bees.

* Got the bee lab results back and our mite testing methods are solid! The results I came up with in my own alcohol wash correlate well with the results I got back. I was right. These hives were taken out by varroa. Now, we just need to get set up to check for nosema spores. See the picture below.

The results back from Beltsville bee lab. Number higher than 2-3 mites per 100 bees are reason to be concerned.
The results back from Beltsville bee lab. Number higher than 2-3 mites per 100 bees are a reason to be concerned.

Click here to see a video of a deadout similar to the one that these bees were sampled from

View some pictures

Bees looking to be getting moisture from cement blocks.
Laying out the tools to check hives and process deadouts.
Poor queen.
Dead bees
Taking samples of bees.
Dead bees on top of beetle traps.
Bees frozen in time. Note queen in the center and capped honey stores on the side.
Thick crpet of bees on bottom board of a deadout.
Taking bee samples from bottom board of a deadout.
Bees frozen in time. Note queen in the center.
Collecting varroa in bowl.
Collecting varroa mites to count.
Counting varroa mites from bee sample.
Shaking bees that were soaked in alcohol to make mites drop.

Share it:

  • Click to share on Facebook (Opens in new window)
  • Click to share on Twitter (Opens in new window)
  • Click to share on Pinterest (Opens in new window)
  • Click to share on Reddit (Opens in new window)
  • Click to email a link to a friend (Opens in new window)
  • More
  • Click to share on Tumblr (Opens in new window)
  • Click to share on LinkedIn (Opens in new window)
  • Click to share on Pocket (Opens in new window)
  • Click to print (Opens in new window)

Filed Under: beekeeping, how-to Tagged With: beekeeping, how-to

  • « Previous Page
  • 1
  • 2
  • 3
  • 4
  • …
  • 8
  • Next Page »

Search the site

Recent Posts

  • Seasoned cauliflower & quinoa burgers May 7, 2021
  • Preserved Black Walnuts January 17, 2020
  • Nocino Walnut Liqueur July 25, 2019
  • Requeening honeybee colonies with cells July 9, 2019
  • Mushroom Jerky May 27, 2019

Archives

Categories

  • beekeeping (40)
  • charcuterie (13)
  • cheesemaking (7)
  • do-it-yourself (15)
  • family (20)
  • food/culinary (47)
  • friends (21)
  • gardening (3)
  • genealogy (15)
  • grape growing (10)
  • health (3)
  • homesteading (38)
  • how-to (67)
  • music (3)
  • outdoors (30)
  • rants (6)
  • recipe (21)
  • Uncategorized (40)
  • videos (22)
  • winemaking (21)

About AllMorgan

AllMorgan started as a family blog to keep extended family and friends around the world apprised on what's going on at the Morgan Ranch. Over the years, it grew in to something so much more.

Learn More

Welcome to AllMorgan

AllMorgan started as a family blog to keep extended family and friends around the world apprised on what's going on at our Indiana homestead. It always been a cross between a family diary and photo … Read more

Did you know?

The queen bee doesn’t decide what happens in a colony. The workers do. They adjust her feeding to make her do what the majority says. The queen can’t feed herself.

Copyright © 2025 · Outreach Pro on Genesis Framework · WordPress · Log in